First published on the Log Rocket blog
Example code is available here
Live reload: What it is, why you need it, and how to do it across your entire stack
As developers, writing code quickly isn’t our only concern. Getting feedback quickly — i.e., while you are coding — is also a fundamental part of maintaining a rapid pace of development.
The code we produce should also be valuable and reliable. But how can you tell if your code is valuable? Only you (or your company) can decide that. Is your code reliable? Well, that is something you must test for yourself — and for that, you must run your code frequently to check its output and behavior.
We can create a faster and more seamless workflow by having our application automatically reload, what we call live reload, during development.
In this blog post, we will examine a variety of full-stack techniques for live reload to automate the “run it” part of your development pipeline. Wise use of these techniques will help you become a faster developer.
Please don’t feel the need to read this entire blog post, you only need to read about the particular technologies that interest you. To make it easy, here’s a list of what we’ll cover:
- What is live reload?
- Scaling our performance with live reload
- Live reload is for development
- Getting the example code
- Live reload with Node.js and nodemon
- Configuring nodemon
- Live reload with nodemon and TypeScript
- Automated testing for JavaScript code with Jest in watch mode
- Automated testing for TypeScript code with Jest in watch mode
- Live reload in the frontend with Parcel
- Live reload in the frontend with Webpack
- Live reload of JavaScript code in a Docker container
- Live reload of TypeScript code in a Docker container
- Conclusion
The topics in this post increase in difficulty as you move through it, and we’ll go back and forth between backend and frontend experiences as well. Let’s get into it.
What is live reload?
Live reload is an automated approach to restarting our application during development. It enables our app to automatically and simultaneously pick up code changes while we are coding. Enabling this saves you countless manual and tedious restarts.
It’s quite typical for developers to use live reload when creating a webpage, but we can also apply this technique across our whole stack.
Figure 1, below, shows where live reload fits in our coding cycle. Note the part of the diagram that says “This part can be automated” — this is where live reload fits.
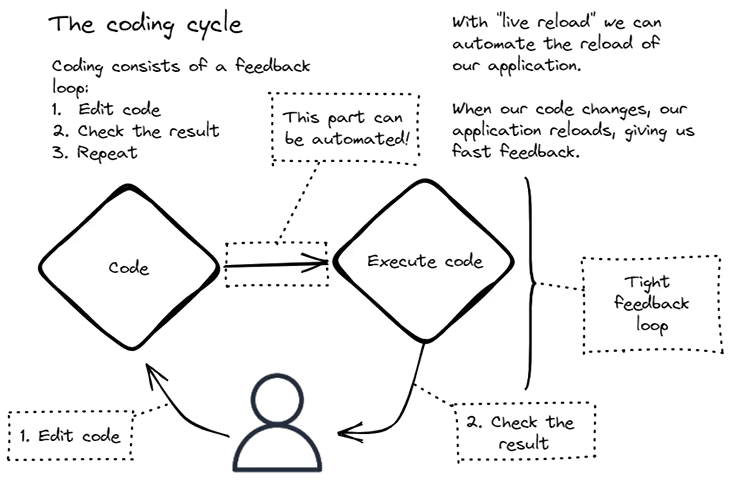
Figure 1. The coding cycle
If you haven’t used live reload before, let me paint a picture for you. I have my IDE open (I use VS Code), and I’m editing the code for my application.
I also have a terminal open — let’s say it’s running my backend with live reload. (If I’m working on a frontend, I’ll have it open in a web browser.)
As I edit my code and save the file, the application (backend or frontend) automatically reloads to pick up the latest code changes — each tiny code change triggers a reload. This automation delivers the fastest feedback possible.
Often, as a fullstack developer, I take this to the extreme. For example:
- One terminal running a microservices application (under Docker Compose)
- One terminal for a particular microservice on which I’m focusing
- One terminal for my development server
- A browser window for the frontend
- Another terminal (or maybe two!) running automated tests
As soon as I change any code, I can watch as live reload kicks in across my multiple terminals and browser windows.
This might sound like a lot of windows to have open (I mostly use a desktop computer with three screens), but it’s incredibly useful to be able to edit code across your stack and see the results almost instantly without having to manually restart or synchronize anything.
Below, Figure 2 shows the coding cycle unraveled over multiple iterations. This is a birds-eye view of the ongoing process of development.
Through this process, we take our code from working state to working state, accumulating working code and minimizing the build up of bugs. Any improvements that we can make to each small iteration of coding will have an amplified effect on our overall development process.
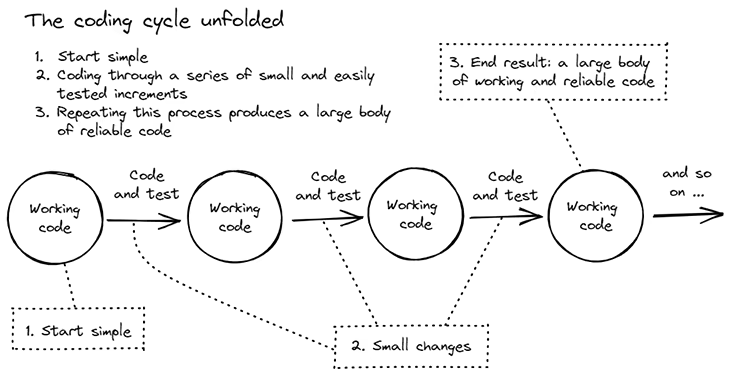
Figure 2: The coding cycle unfolded
Scaling our performance with live reload
Live reload can have a dramatic effect on our performance — not just because it automates the boring and tedious manual reload, but also because it can be scaled up.
To start with, we can scale it across the many processes that comprise our application — and then, it’s automatically scaled across the iterations in our development process, resulting in a large overall improvement.
Live reload also has the positive side effect that it encourages small changes and frequent testing, which helps you produce more reliable code.
Live reload is for development
Before we get into the implementation details, I want to point out that the live reload techniques presented here are only meant to be used in development. Our needs for production are quite different.
In production, for example: we want safe, secure and optimized Docker images where the code is baked into the image and immutable. But in development, we prefer images that are understandable (e.g. not optimized), debuggable and where the code is mutable, so that we can reload the code while we are editing it.
As a result, production has a whole different set of concerns than development, and we’d like to treat it differently. However, in this blog post, we’ll just be talking about live reload in development.
Getting the example code
Now that we know what live reload is and why it’s useful, let’s dive into the implementation.
Working code for all the following examples is available in this GitHub repository. You can either use git clone to get a copy of the code or you can simply download a zip file of the code.
Please get the code so you can follow along and try out each of the examples. You’ll need to have Node.js installed to run these examples. You’ll need Docker Desktop installed for the final two examples.
Live reload with Node.js and nodemon
In this first example, we’ll look at live reload for a Node.js application using nodemon.
nodemon is a package that runs under Node.js; it’s best to think of it as a drop-in replacement for Node, which means that instead of invoking node index.js to start our Node application, we instead invoke npx nodemon index.js (with index.js being a fairly common entry point for a Node.js application). This is illustrated in Figure 3.
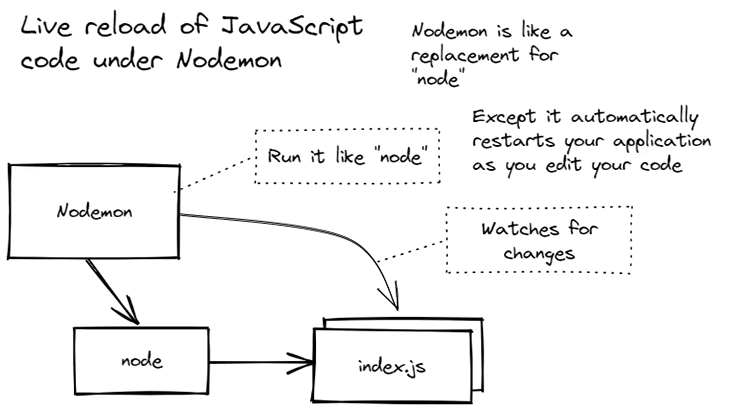
Figure 3: Running JavaScript code with live reload using Nodemon
In case you are wondering about the npx command, it allows us to invoke a locally installed package.
Using nodemon is a bit different to using the normal node command, because it watches our code for changes. Whenever our code does change (i.e., when we change index.js or any other code file) nodemon automatically restarts our Node.js application so that it picks up our updated code.
That’s it, it’s as simple as that!
But we still have some work to do because we shouldn’t invoke nodemon directly. To conform to Node.js conventions, we should at least implement the start script in the package.json configuration file.
You can see in the package.json file below that we set the start script to be node index.js; we don’t use nodemon here because using npm start is the typical way to start a Node.js application in production, and we shouldn’t use nodemon or live reload in production.
{
    "main": "index.js",
    "scripts": {
        "start": "node index.js",
        "start:dev": "nodemon index.js"
    },
    "devDependencies": {
        "nodemon": "^2.0.15"
    }
}
Instead, I’ve added another script called start:dev, which is our start script for use during development. The name start:dev is just my personal convention, so feel free to rename this to whatever you want — just don’t change the name of the start script, because that is an official convention!
This script uses nodemon, so it starts our application in development mode and enables live reload. If you’d like to learn more about the scripts entry in package.json, I suggest visiting the npm docs.
This is where you should try the code for yourself, if you haven’t already. Open a terminal and change into the directory of the code repository.
Change into the directory for example 1:
cd 1-nodemon-exampleInstall dependencies; this installs nodemon:
npm installFirst, try running the Node.js application in production mode:
npm startYou should see Hello world printed to your terminal.
At this point, we have run it successfully in production mode — we aren’t using nodemon or live reload, that’s not something we want in production. You can prove to yourself that live reload isn’t enabled by editing the code in index.js and saving the file. Nothing happens. That’s good! It’s how we want it to work in production.
Hit Ctrl+C a couple of times to stop the Node.js application.
Now, let’s run it in development mode so we can try out live reload:
npm run start:devTry changing and saving the code. Go into index.js and change the console.log message to something else, like, “Hello computer” (Star Trek fans, are you with me?).
Save the file and watch your terminal to see nodemon restarting your application. Continue playing with this as long as you want. Feel free to introduce some errors in the code just to see what happens!
Configuring nodemon
In the second example, let’s learn how to configure nodemon. The example below shows the nodemon.json configuration file.
{
    "watch": [
        "src/"
    ],
    "ignore": [
        "src/test/"
    ],
    "exec": "node src/index.js"
}
There’s a few things to note here.
First, we have told nodemon to watch the src subdirectory for changes. This example moves index.js to the src subdirectory, which is a convenient way to separate our code files from other files in the project, so that, for instance, we can be more selective about the files that nodemon is watching.
We are also configuring nodemon to ignore all files under src/test. This is normally where we’d keep the automated tests in this project, but this project doesn’t actually have any automated tests yet. I wanted to show how we can have nodemon ignore them because we’ll be using a different live reload system for our automated tests (we’ll circle back to that in example four.
The last thing to note in the configuration file is how the exec field configures nodemon to invoke node src/index.js. This means we can simply invoke npx nodemon with no parameters and it knows what command to run by looking in its configuration file.
You might also realize at this point that we can replace the exec field with literally any other command. This makes nodemon very flexible. We can use it to watch any type of file and run any sort of command (I’m probably not the first person to use nodemon to create a live reload data processing pipeline that is triggered by updated data).
Now is the time to try this for yourself. It’s the same as running the example above (don’t forget the npm install). Invoke npm run start:dev. You might like to confirm that changes to src/test/test.js are ignored by nodemon and don’t trigger a restart of the application.
Learn more about nodemon configuration on the npm webpage and find a sample configuration here.
Live reload with nodemon and TypeScript
Because I’m a fan, I just had to include an example with TypeScript in this blog post.
Using TypeScript with nodemon could be very difficult. You might imagine that we’d have to compile the TypeScript code to JavaScript before restarting our application. While this is possible, it would be kind of complicated as it might require running multiple commands in parallel.
Fortunately for us, there is ts-node. ts-node can also be seen as a drop-in replacement for Node.js. We can use npx ts-node src/index.ts to run TypeScript code directly without having to compile the code first. This makes it so much easier to work with TypeScript during development, although it’s not something you’d want to use in production. It also makes learning TypeScript easier, and is a lot less hassle to use to build a quick prototype or experiment with TypeScript.
To enable live reload of TypeScript code we can use ts-node in combination with nodemon, as shown in figure 4.
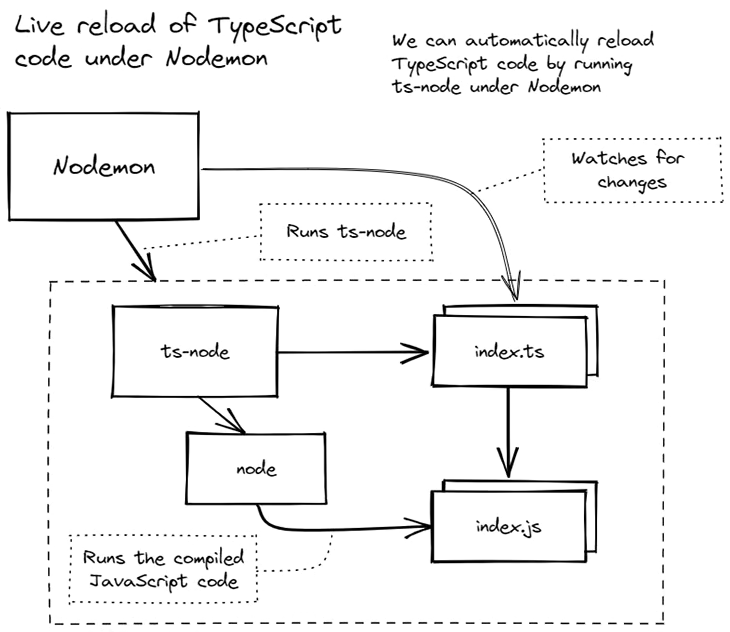
Figure 4: Running TypeScript code with live reload using Nodemon
The configuration for nodemon with ts-node gets a little more complicated. The start and start:dev scripts in the example below, extracted from the package.json file for the TypeScript project, are much the same as what we saw earlier.
{
    "main": "build/index.js",
    "scripts": {
        "start": "node ./build/index.js",
        "start:dev": "nodemon",
        "build": "tsc --incremental",
        "clean": "rm -rf ./build && rm tsconfig.tsbuildinfo"
    },
    "devDependencies": {
        "@types/node": "^17.0.10",
        "nodemon": "^2.0.15",
        "ts-node": "^10.4.0",
        "typescript": "^4.5.5"
    }
}
Now, though, we also have new scripts: build and clean. Invoke npm run build to build the TypeScript code for use in production. After we’ve built it, we can invoke npm start to execute the compiled JavaScript code.
We can also invoke npm run clean to delete the compiled code. This is similar to my full production TypeScript project setup, which you can see in my typescript-template repo.
The nodemon configuration for the third example is shown below. There are a couple of changes here from the previous version:
- We have configured nodemon to only watch changes for files with a
tsextension - In the
execfield, note that we are running our TypeScript code (`index.ts) directly, using ts-node
{
    "watch": [
        "src"
    ],
    "ext": "ts",
    "ignore": [
        "src/test/"
    ],
    "exec": "npx ts-node ./src/index.ts"
}
It’s your turn again. Run this example the same as before, but don’t forget the npm install command. Invoke npm run start:dev and try saving changes to index.ts before watching nodemon restart the application.
Automated testing for JavaScript code with Jest in watch mode
For the fourth example, let’s return from TypeScript to JavaScript for some automated testing, possibly the most exciting part of this little adventure!
We can also use live reload to automatically restart our automated tests while we are editing our code. I’m using Jest to demonstrate this, but other testing frameworks usually support live reload. Figure 5, below, shows how Jest watches our code for changes and then automatically reruns our automated tests.
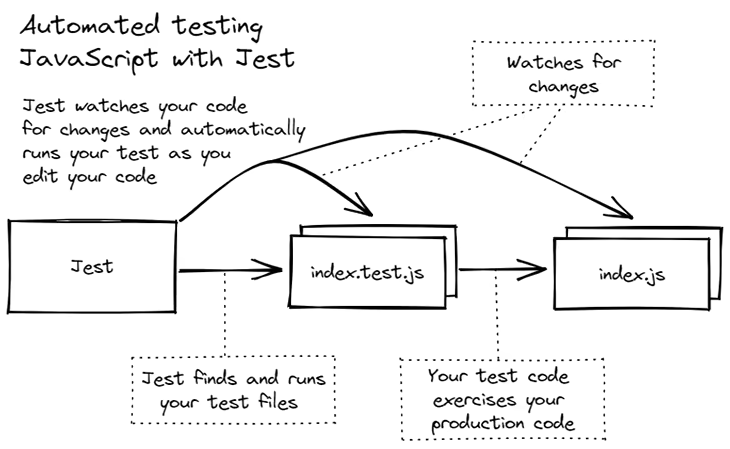
Figure 5: Automated testing for JavaScript code with Jest in watch mode
The nice thing about Jest is that there is almost no configuration. For this example, I generated a configuration using npx jest --init and answered a few questions. Live reload is included; we simply have to run Jest in “watch mode” by using the --watch argument:
npx jest --watchTake note that, by default, Jest only runs code that has changed in Git, so you may have to hit the a key to force it to run all tests.
Of course, we can’t just leave it at that because we’d like to follow Node.js conventions and have a test script, as shown below in the extract from the package.json file. Now we can use the conventional Node.js command npm test to run our tests.
The example below also includes the script test:watch. This is my personal convention for running automated tests with live reload, but you can feel free to rename this script to whatever you like.
{
    "scripts": {
        "test": "jest",
        "test:watch": "jest --watch"
    },
    "devDependencies": {
        "jest": "^27.4.7"
    }
}
Now, it’s time for you to try it out. Run this example in the usual way and don’t forget the npm install. As usual, to run the actual application, invoke npm start or npm run start:dev. This time though, you’ll probably also want to try running the automated tests!
To run the tests just once:
npm testTo run the tests with live reload enabled:
npm run test:watchOnce again, you’ll want to note that Jest only runs code that has changed in Git by default, so you may have to hit the a key to force it to run all tests.
Try editing the code (index.js) or the tests (index.test.js). Changing and saving either of these files will trigger a restart of your automated tests.
Coding and having almost instant feedback from automated tests is one of the best ways of developing code.
Learn more about Jest from their webpage and getting started guide.
Automated testing for TypeScript code with Jest in watch mode
Again my TypeScript bias comes into play, so for the fifth example, let’s look at automated testing with TypeScript code!
Previously, we used ts-node to run our TypeScript code directly during development. Now, for automated testing, we’ll use ts-jest. This is a plugin for Jest to run automated tests directly from TypeScript code. It’s very convenient because otherwise we’d need a more convoluted build pipeline to compile our TypeScript tests to JavaScript before running them.
Figure 6 shows how Jest uses ts-jest to automatically compile our TypeScript code to JavaScript before running the tests.
Figure 6: Automated testing for TypeScript code with Jest in watch mode
Besides installing ts-jest, we don’t have to do much, except configure Jest to use ts-jest, as shown below in the Jest configuration file.
export default {

    modulePathIgnorePatterns: [
        "<rootDir>/build"
    ],

    preset: "ts-jest",
};
Note from above, that the modulePathIgnorePatterns field is set to ignore all files under the build subdirectory. That’s where the compiled JavaScript files are generated. We have to ignore that directory — otherwise, after we build our project (using npm run build), Jest will think there are two sets of automated tests (the TypeScript code and the compiled JavaScript code).
Jest doesn’t care, it will just run both sets of tests, but this can be very confusing for us because we only want it to run the tests from the TypeScript code.
You can run this code in the same way as the last example (don’t forget the npm install). Either invoke npm test to run the test just once, or npm run test:watch for live reload. Try changing and saving the TypeScript code (index.ts or index.test.ts) and watch Jest automatically restart the tests.
See the Jest configuration docs to learn more about Jest configuration. ts-jest also has good documentation.
Live reload in the frontend with Parcel
With the sixth example, we finally arrive at the frontend! Parcel is an easy to use frontend bundler. It will take a collection of source assets (e.g., HTML, CSS, and JavaScript) and compile them to a static webpage that can be served by a simple web server and displayed in any browser.
I’m starting here with Parcel instead of Webpack for the following reasons:
- Parcel is easier to use
- It requires zero configuration for many use cases
- It has a built-in dev server
- It has automatic support for live reload!
We’ll use Parcel’s inbuilt dev server to build our bundle, serve it as a webpage, and then automatically reload as we edit our code. This is illustrated in Figure 7.
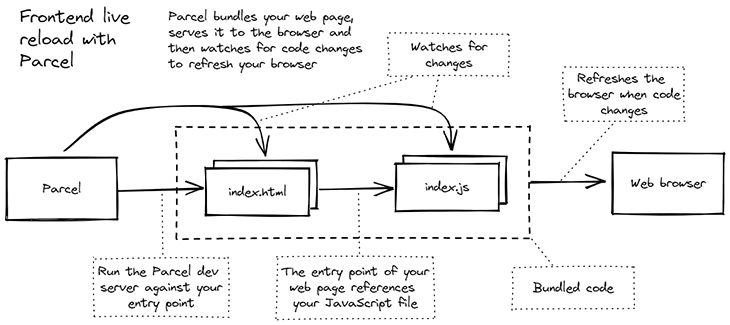
Figure 7: Live reload in the frontend with Parcel
We can start Parcel’s dev server just by invoking Parcel and pointing it to the entry point for our webpage:
npx parcel src/index.htmlAnd to build a static webpage for use in production:
npx parcel build src/index.htmlIf you are trying to run this on a Windows computer, please be sure to replace all forward slashes with backslashes, like this:
npx parcel src\index.htmlIn the package.json file for this example (see below), you’ll see the usual sort of scripts for start and build. You might find it strange that there’s no start:dev script this time!
Instead, we will have the start script run Parcel’s dev server with live reload. We only need one start script here because production simply doesn’t require any script. We run this in production by building it and copying the files to our web server.
{
    "scripts": {
        "start": "parcel src/index.html",
        "build": "parcel build src/index.html",
        "clean": "rm -rf dist"
    },
    "devDependencies": {
        "live-server": "^1.2.1",
        "parcel": "^2.2.1"
    }
}
You can try this out by invoking npm start (but only after npm install). Now, open your browser to view the webpage. You should see a link in the terminal that you can click to open the webpage, something like http://localhost:1234.
While viewing the webpage, try changing the code in index.html or index.js. When you save your changes, you’ll see the webpage automatically refresh.
What is live-server?
You may have noticed the dev dependency live-server in the code above. Live Server is a great little development server that we can use to test the production build of our webpage. You might want to try this out because it’s another cool example of live reload.
First, build the webpage by invoking npm run build. This creates the static webpage under the dist subdirectory. Now, change your directory to dist and run Live Server from there:
cd dist
npx live-server
This should automatically open a browser window and load your webpage. This is interesting because Live Server (as you can probably tell by the name) includes live reload. If the files in dist change (regardless of whether you rebuild the webpage or just modify the files), then Live Server reloads the browser to show the updated webpage.
We can do some interesting things with this, like creating a live reload pipeline where we rebuild the production webpage on changes and then use Live Server to refresh the webpage.
The Parcel build command doesn’t support a watch mode like Jest does, but I’d recommend checking out the chokidar package for some help building your own live reload pipeline.
You can learn more about Parcel and get started with their official guide. Parcel has a separate doc for TypeScript.
Live reload in the frontend with Webpack
Didn’t think we’d entirely skip Webpack, did you? Example seven is the one for you.
Webpack is another webpage bundler. Typically, we use it to bundle JavaScript or TypeScript code to be included in a static webpage.
I had to include Webpack because it is very common, but I saved it until after Parcel because, unfortunately, Webpack is a lot more difficult to set up than Parcel. In fact, it’s difficult enough that I’m only going to present a limited example here, but it’ll still be good enough to use in many projects.
Unlike Parcel, Webpack doesn’t include a dev server, so this is something you have to install separately. Figure 8 shows how Webpack’s dev server watches for changes to our code and then triggers the Webpack CLI to build our bundle. It then automatically refreshes the browser to show the updated webpage.
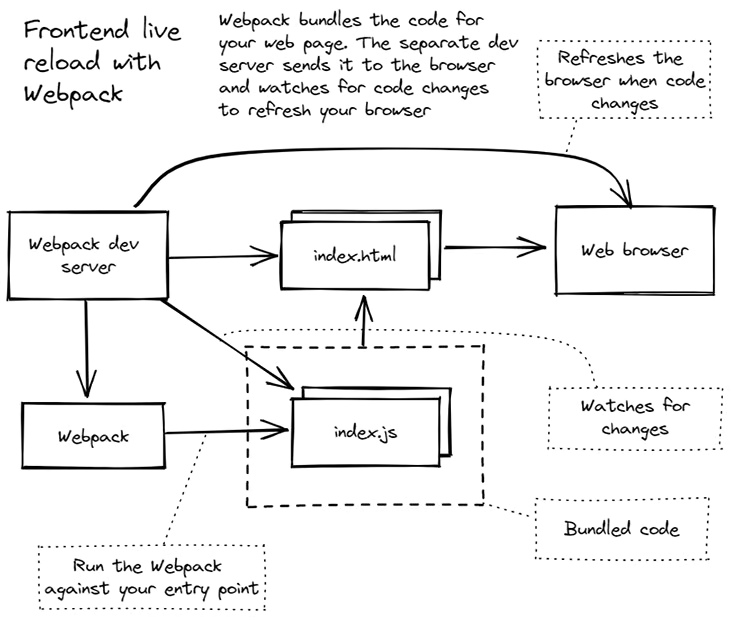
Figure 8: Live reload in the frontend with Webpack
The Webpack dev server extends the Webpack CLI with a serve command. Running it can be a simple as this:
npx webpack serve --openThe --open argument automatically opens a web browser to view the webpage.
To build a static webpage for production, we just run the webpack command by itself:
npx webpackThe package.json file below shows our start and build scripts configured to run Webpack for our frontend project.
{
    "scripts": {
        "build": "webpack",
        "clean": "rm -rf ./dist",
        "start": "webpack serve --open"
    },
    "devDependencies": {
        "html-webpack-plugin": "^5.5.0",
        "live-server": "^1.2.1",
        "webpack": "^5.67.0",
        "webpack-cli": "^4.9.2",
        "webpack-dev-server": "^4.7.3"
    }
}
What makes Webpack more difficult than Parcel is that we’ll need a configuration file, even for the smallest project. Luckily, for this small project, the configuration file shown below is still quite simple — but believe me, they can get way more complicated than this!
const path = require('path');
const HtmlWebpackPlugin = require('html-webpack-plugin');

module.exports = {
    entry: './src/index.js',
    output: {
        filename: 'index.js',
        path: path.resolve(__dirname, 'dist'),
    },
    devtool: "source-map",
    mode: "development",
    devServer: {
        static: './dist',
        hot: false,
    },
    plugins: [
        new HtmlWebpackPlugin({
            template: "src/index.html"
        }),
    ],
};
The most important thing to point out in the above code is the devServer field that configures our development server. From here, you can tell the development server where static files are served from.
Also, note that the hot field is set to false. If you set this to true, live reload doesn’t work!
It might seem weird that we have to turn off hot to enable live reload. But the confusing thing here is that live reload and hot module replacement (HMR) are two separate things. Live reload is enabled by default in the dev server, but only if HMR is disabled.
What are the differences between live reload and HMR?
The main difference between live reload and HMR is that HMR is more efficient. Live reload refreshes the entire webpage in the browser when anything changes.
HMR, on the other hand, will only reload those code modules that have changed. HMR is faster because it doesn’t have to refresh the whole page.
Some will say that HMR is better than live reload, and that’s true in some situations. For many projects, however, live reload will be good enough — and you won’t have to go through the difficulty of getting HMR configured correctly.
The Webpack documentation and getting started guide are good resources — as are their docs on hot module replacement, if you want to dig deeper into that.
Live reload of JavaScript code in a Docker container
After spending some time in the frontend let’s swing back to the backend for the eighth example!
You might be surprised to learn that we can make use of live reload within Docker containers. This means we can scale up live reload to larger microservices applications.
Again, live reload is something we only want to use in development. It can be very useful to have live reload running with a microservices application on our development computer (using Docker Compose), as then we’ll be able to edit the code for any microservice and have it automatically restart within its Docker container. This is an efficient way to work with microservices because when you edit the code for a microservice, only that microservice will be restarted, while other microservices remain unaffected.
To run this example, you’ll need Docker Desktop installed. It’s easy to install and use for MacOS (just download, run, and follow the prompts), but a bit more difficult to install on Windows.
The good news is that we already learned about most of the tools we need for this. We’ll use nodemon again to restart our Node.js application, but this time we are running it inside a Docker container. As you can see in Figure 9, a big part of this puzzle is how we share the source code from our development computer into the container.
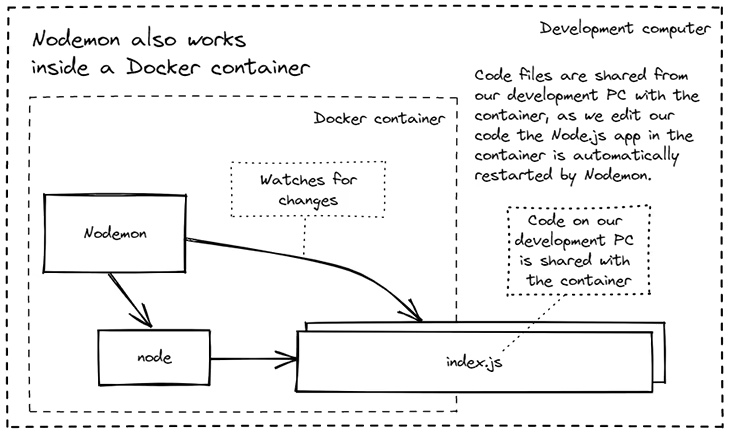
Figure 9: Live reload using Nodemon inside the Docker container
The Dockerfile shown below creates the Docker image for this example. A Dockerfile is like a script for building a Docker image, which is like a snapshot or a server or microservice from which we can instantiate a container.
In this particular Dockerfile, we start our Node.js application using npm run start:dev. If you remember back to our first example, this starts our application with nodemon and enables live reload.
FROM node:16.13.1

WORKDIR /app
COPY package*.json ./
COPY nodemon.json ./

CMD npm config set cache-min 9999999 \
    && npm install \
    && npm run start:dev
There’s some complexity in this code that exists for a good reason. You might be wondering about the commands npm config set cache-min 9999999 and npm install.
The npm install installs the dependencies for our application at start-up time. For a production Docker image (think of our example as a development Docker image), you wouldn’t normally install packages this way; during development, though, we install dependencies at start-up time for two reasons.
The first reason is that installing dependencies while building the images (like we should for production images) can be very slow. It’s simply much faster to do it at start-up time — mainly because we can control how dependencies are cached.
The second reason is that, during development, we are constantly changing code and installing new dependencies. We want to be able to install new dependencies by restarting the container without having to rebuild the image. This makes it faster to add new dependencies as we evolve our code during development.
The other command, npm config set cache-min 9999999, sets the cache timeout to a ridiculously large value. This makes it much faster to restart a container, and forces dependencies to be cached, which we’ll explain further in a moment.
The most important part of the example above is what isn't there. You'll notice that there is no RUN line that copies the source code into the image. This is what we'd normally do in production: we'd bake the code into the image. For development though we need the code in the container to mutable so that we can update it as the code changes.
So the question that remains is: how do we get updated code from our development computer into the container? For that, we need to configure a Docker volume to share our code into the running container.
Configuring the Docker volume
I have found that the easiest way to share code from development computer to container is to use Docker Compose, which makes it a bit simpler to configure the volume — not to mention that you’re probably using Docker Compose to run multiple microservices, anyway.
The example code below shows the Docker Compose file for this example, configured to run a single microservice.
version: '3'
services:

  microservice:
    image: microservice
    build:
      context: ./microservice
      dockerfile: Dockerfile-dev
    container_name: microservice
    volumes:
     - ./tmp/npm:/root/.npm:z
     - ./microservice/src:/app/src:z
    ports:
     - "4000:80"
    environment:
     - PORT=80
     - NODE_ENV=development
    restart: always
An important thing to note about the above code is the list of items in the volumes section.
The first item — ./tmp/npm:/root/.npm:z — shares the npm cache between the development computer and the container. Successive restarts of the container benefit from the shared cache, which makes it much faster to restart the container.
The second item — ./microservice/src:/app/src:z — is what actually shares our source code from the development computer into the container. As we edit our code, the changes are automatically shared into the container and picked up by nodemon, which restarts the Node.js application.
You can run this example yourself like this:
cd 8-docker-example
docker compose up ---build
The --build argument forces the Docker image to build.
Now, try making a code change and save the file. You should see that nodemon detects the change and restarts the Node.js application that is running inside the container.
The next time you start the application, you can probably omit the --build argument:
docker compose upThat makes it faster to start because it doesn’t build the image.
Another thing to note is that you’ll have to restart the whole thing manually (using docker compose up) to have new dependencies installed. nodemon will detect code changes (including new dependencies added to package.json) but we haven’t configured it to install updated dependencies. So, a full, manual restart is necessary whenever you add new dependencies.
You could change this, of course, but I’ll leave that as an exercise for you to try out on your own.
Live reload of TypeScript code in a Docker container
Here we are, at the final example! Here, we’ll demonstrate how we can automatically reload TypeScript code inside a Docker container.
This time around, though, there’s nothing to show! You already know nodemon and TypeScript from example three, and the Docker configuration is identical to example eight.
The only thing that remains is for you to try running it and make some code changes:
cd 9-docker-example-typescript
docker compose up ---build
This example shows how to use live reload for TypeScript code in a Docker container, but like this entire blog post, it’s for use in development only.
Effective production use of TypeScript requires a more sophisticated build pipeline, which is something you can read about in my earlier post, Crafting build pipelines with Docker.
Conclusion
This blog post has demonstrated how to use live reload across your stack to help build a streamlined and fast paced development process.
We enabled live reload for Node.js applications with nodemon. We used Jest in watch mode to enable live reload for JavaScript and TypeScript automated tests. We saw that Parcel comes with a development server that includes live reload, and configured Webpack to use live reload with its development server. Finally, we enabled live reload within a Docker container, which means we can scale up live reload to a larger microservices application.
With all of the benefits considered, it should be obvious why live reload is part of the foundation of my own philosophy, and one of the core techniques from my book, Rapid Fullstack Development. Live reload is a key ingredient for a faster development process.
Follow me on Twitter for more content like this.