What does it take to render a photo gallery in the browser when that gallery contains over 100,000 photos?
Ashley Davis has jumped through many technical hoops to create a seamless photo gallery with near instant loading of photos from any location in the 100k photo gallery. In this post, learn the variety of techniques required to implement a high performance web page of this nature.There will be some things you might expect and a few things that you won’t expect.
Live demo
Click the link for a live demo of the 100,000 photo gallery:
https://photosphere-100k.codecapers.com.au/
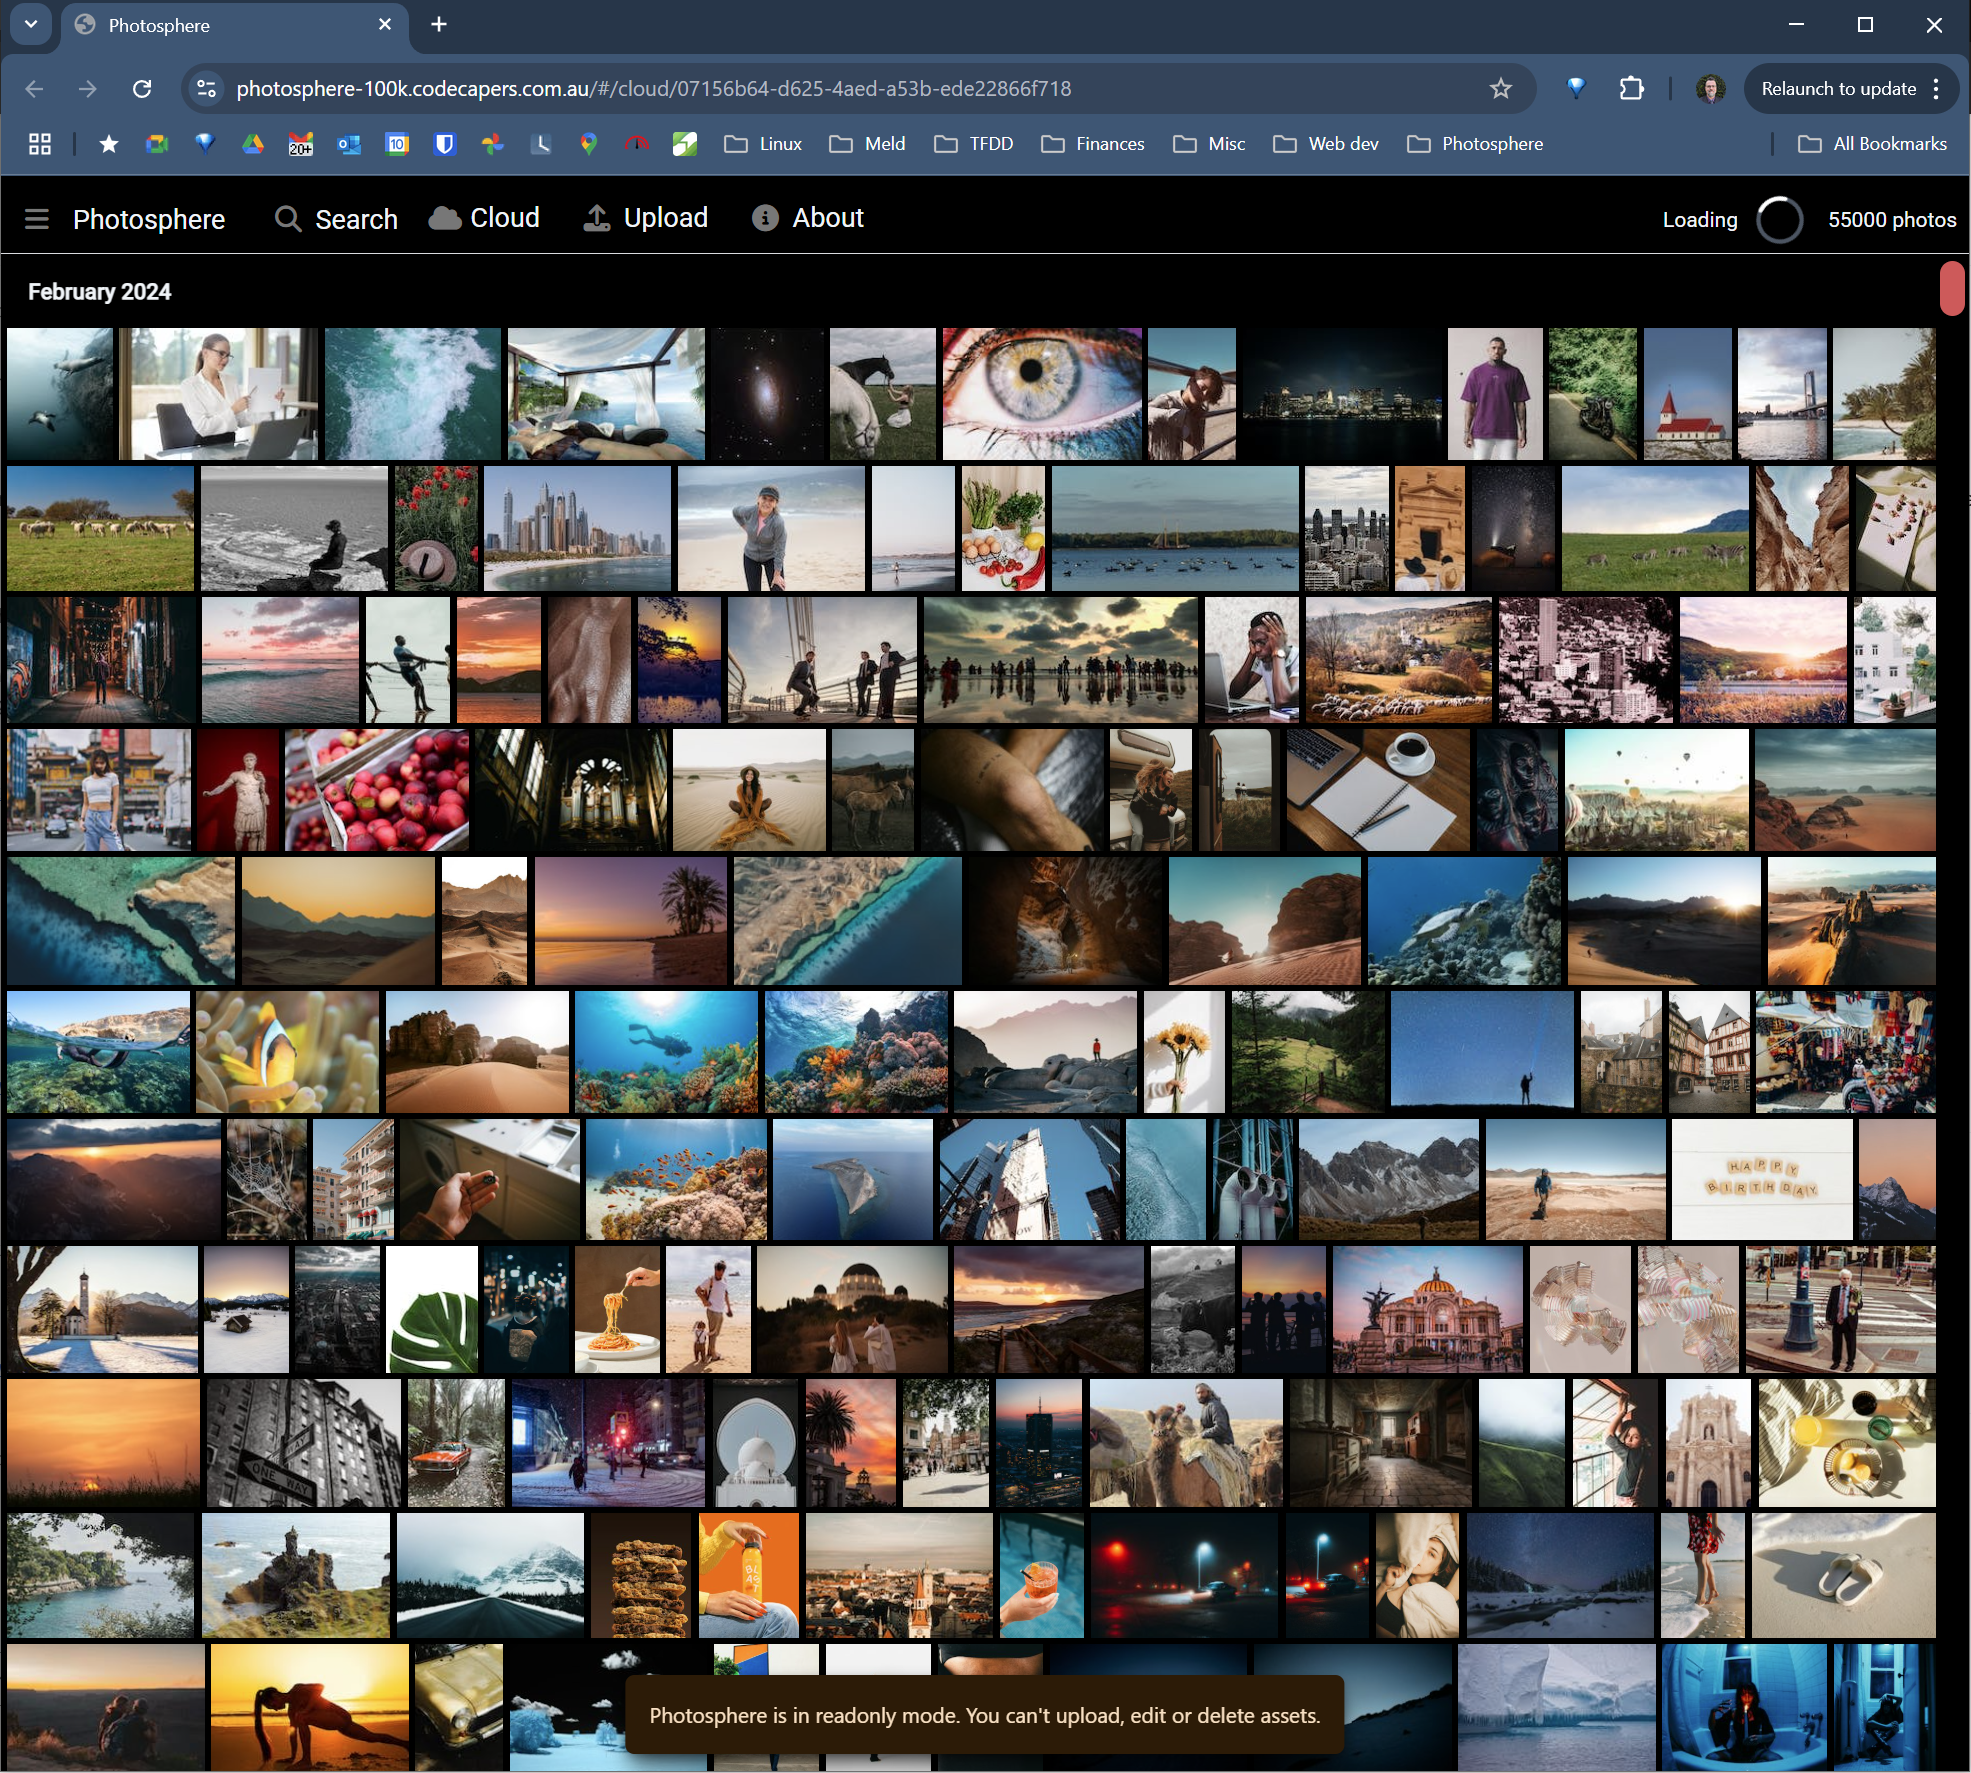
Here is a screenshot of the 100k demo of Photosphere:
The Naive Approach
The first time you create a photo gallery you’ll try what I like to call the naive approach. When doing any development it’s always worthwhile to try the simplest approach first, because often it will just work for you. In this case the simplest approach is to render your photos in a loop using a flexbox wrapping row layout. You can see the code below.
Code for the naive approach: Just render all the images
export function Gallery() {

  const [images, setImages] = useState(null);

  // --snip-- Loads the set of images from the backend.

  return (
    <div
      style={{
        display: "flex",
        flexDirection: "row", // Render a row of images
        flexWrap: "wrap",     // that wraps at the end.
      }}
      >
      {images.map(image => { // Renders every image!
        return (
          <img // Renders one image in a loop.
            style={{
              height: "200px",
            }}
            src={image.thumb}
            />
        );
      })}
    </div>
  );
}
Unfortunately for me, the simplest approach didn’t work out for various reasons. The first reason is the performance. Although you can probably render quite a few photos using the simple approach you definitely can’t render 100,000 this way. The browser just can’t handle it.
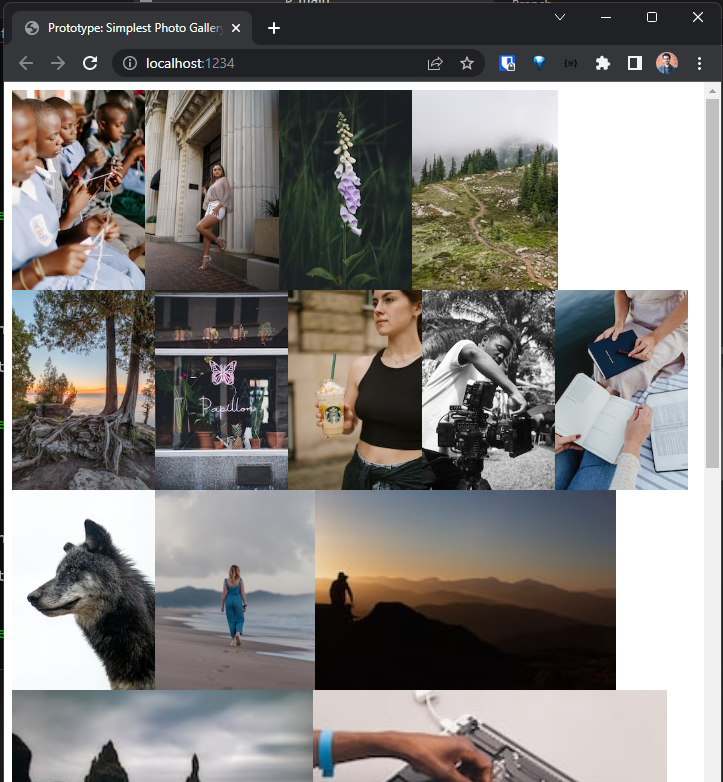
The second reason is that the photo gallery produced by this code is just ugly. You can see in the screenshot below how the photos of varying resolutions result in a jagged right-hand edge of the gallery. It doesn’t have a nice design aesthetic.
A screenshot of the naive approach: Bad performance and it just looks ugly
The Virtual Viewport
To make the photo gallery performant, a virtual view on the gallery is required. When you have a huge amount of photos to display, you can’t afford to display all of them, otherwise you risk hanging or crashing the browser. Instead we should only display the small selection of photos that are currently in view. By “display” I mean that the photos within the bounds of the browser’s viewport are actually manifested (aka rendered) into the browser’s DOM as illustrated in the figure below.
It’s not possible to add 100k images to the browser’s DOM. But we can achieve the illusion of it by only adding the currently visible rows of images to the DOM and not adding those that are not visible.

To make the gallery beautiful I coded a hand-crafted layout algorithm to size and position the photos within the gallery, thus avoiding the jagged right-hand edge. You can see the result in the screenshot at the start of this article.
Initially I implemented the virtual viewport myself - and it wasn’t as difficult as you might expect. But it resulted in annoying glitches and visual flashes when jumping to arbitrary locations in the gallery (even after much optimization for fasting loading of photos - as you’ll read about in a moment).
So eventually, rather than spend more time trying to fix the glitches, I decided to try TanStack Virtual (because I had been impressed by TanStack Query). It turned out to be simple to integrate and worked well with no visual glitches. You can get an idea of how the code looks from the snippet below.
Using TanStack Virtual to only render those images that are currently in view (rather than attempting to render 100k images)
import { useVirtualizer } from '@tanstack/react-virtual';

// --snip-- Other imports go here.

export function Gallery() {

  const [layout, setLayout] = useState(undefined);
  const [galleryWidth, setGalleryWidth] = useState(undefined);
  const containerRef = useRef(null);


  // --snip--
  // Loads the image set and computes the row-based gallery layout.
  // Computes gallery width from the width of the browser window.
  // --snip--

  const rowVirtualizer = useVirtualizer({
    count: layout?.rows.length || 0, // Plug in the number of rows.
    getScrollElement: () => containerRef.current,
    estimateSize: (i) => layout?.rows[i].height || 0, // Get the size of each row.
    overscan: 0, // Don't load anything outside the viewport.
  });

  //
  // Gets the rows that are currently visible in the viewport.
  //
  const virtualRows = rowVirtualizer.getVirtualItems();

  return (
    <div ref={containerRef}>
      <div
        style={{
          width: `${galleryWidth}px`,
          height: `${rowVirtualizer.getTotalSize()}px`,
          overflowX: "hidden",
          position: "relative",
        }}>
        // --snip--
        // Renders each image using absolute positioning.
        // But only those images currently overlapping
        // with the viewport are actually rendered.
        // --snip--
    </div>
  );
}
Near Instant Loading
We can render 100,000 photos by displaying the visible portion using TanStack Virtual. But we still have a problem when we scroll to another page of the gallery. When we arrive at a new page, the photos on that page take a noticeable amount of time to load. They flicker into view one at a time as they load from the backend and are rendered into the browser. It’s ugly and not a nice user experience. Getting a new page of photos to load almost instantly requires a few tricks.
Thumbnails
The first and most obvious thing is that we shouldn’t be rendering full resolution photos in our gallery. Thumbnails, smaller versions of our photos, are an essential first step. Because they are smaller than the full versions so they are much quicker to load.
Creating a thumbnail means reducing the file size of an image by reducing its resolution and quality
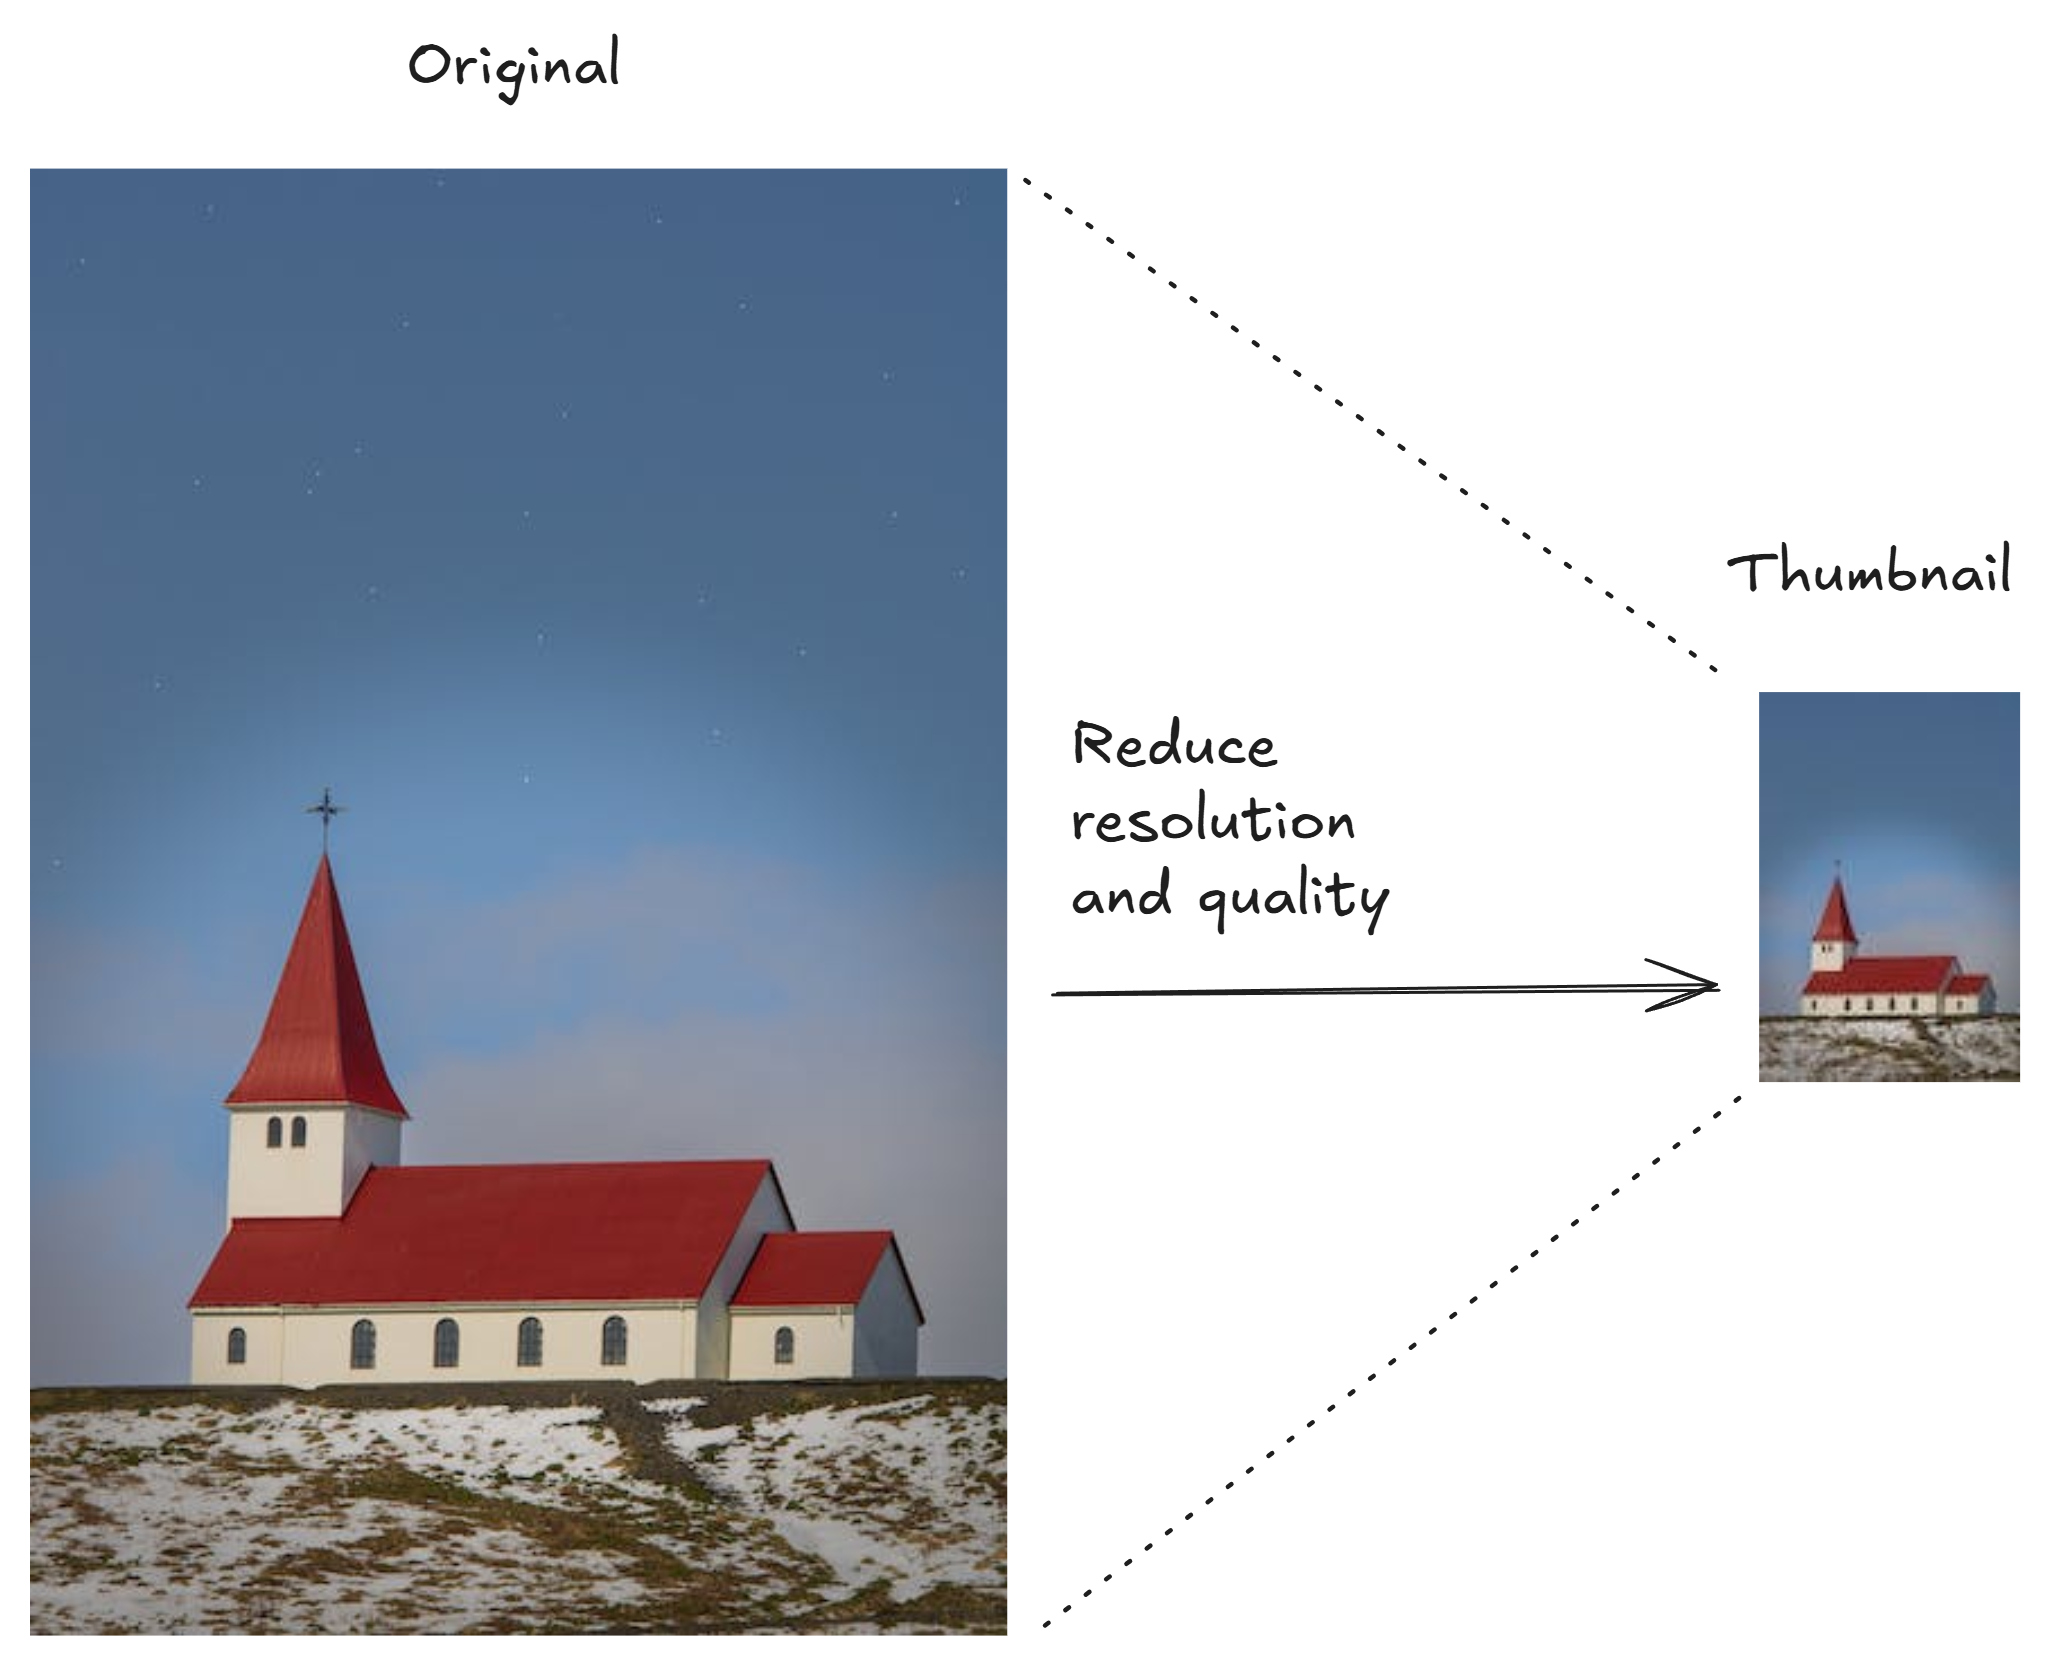
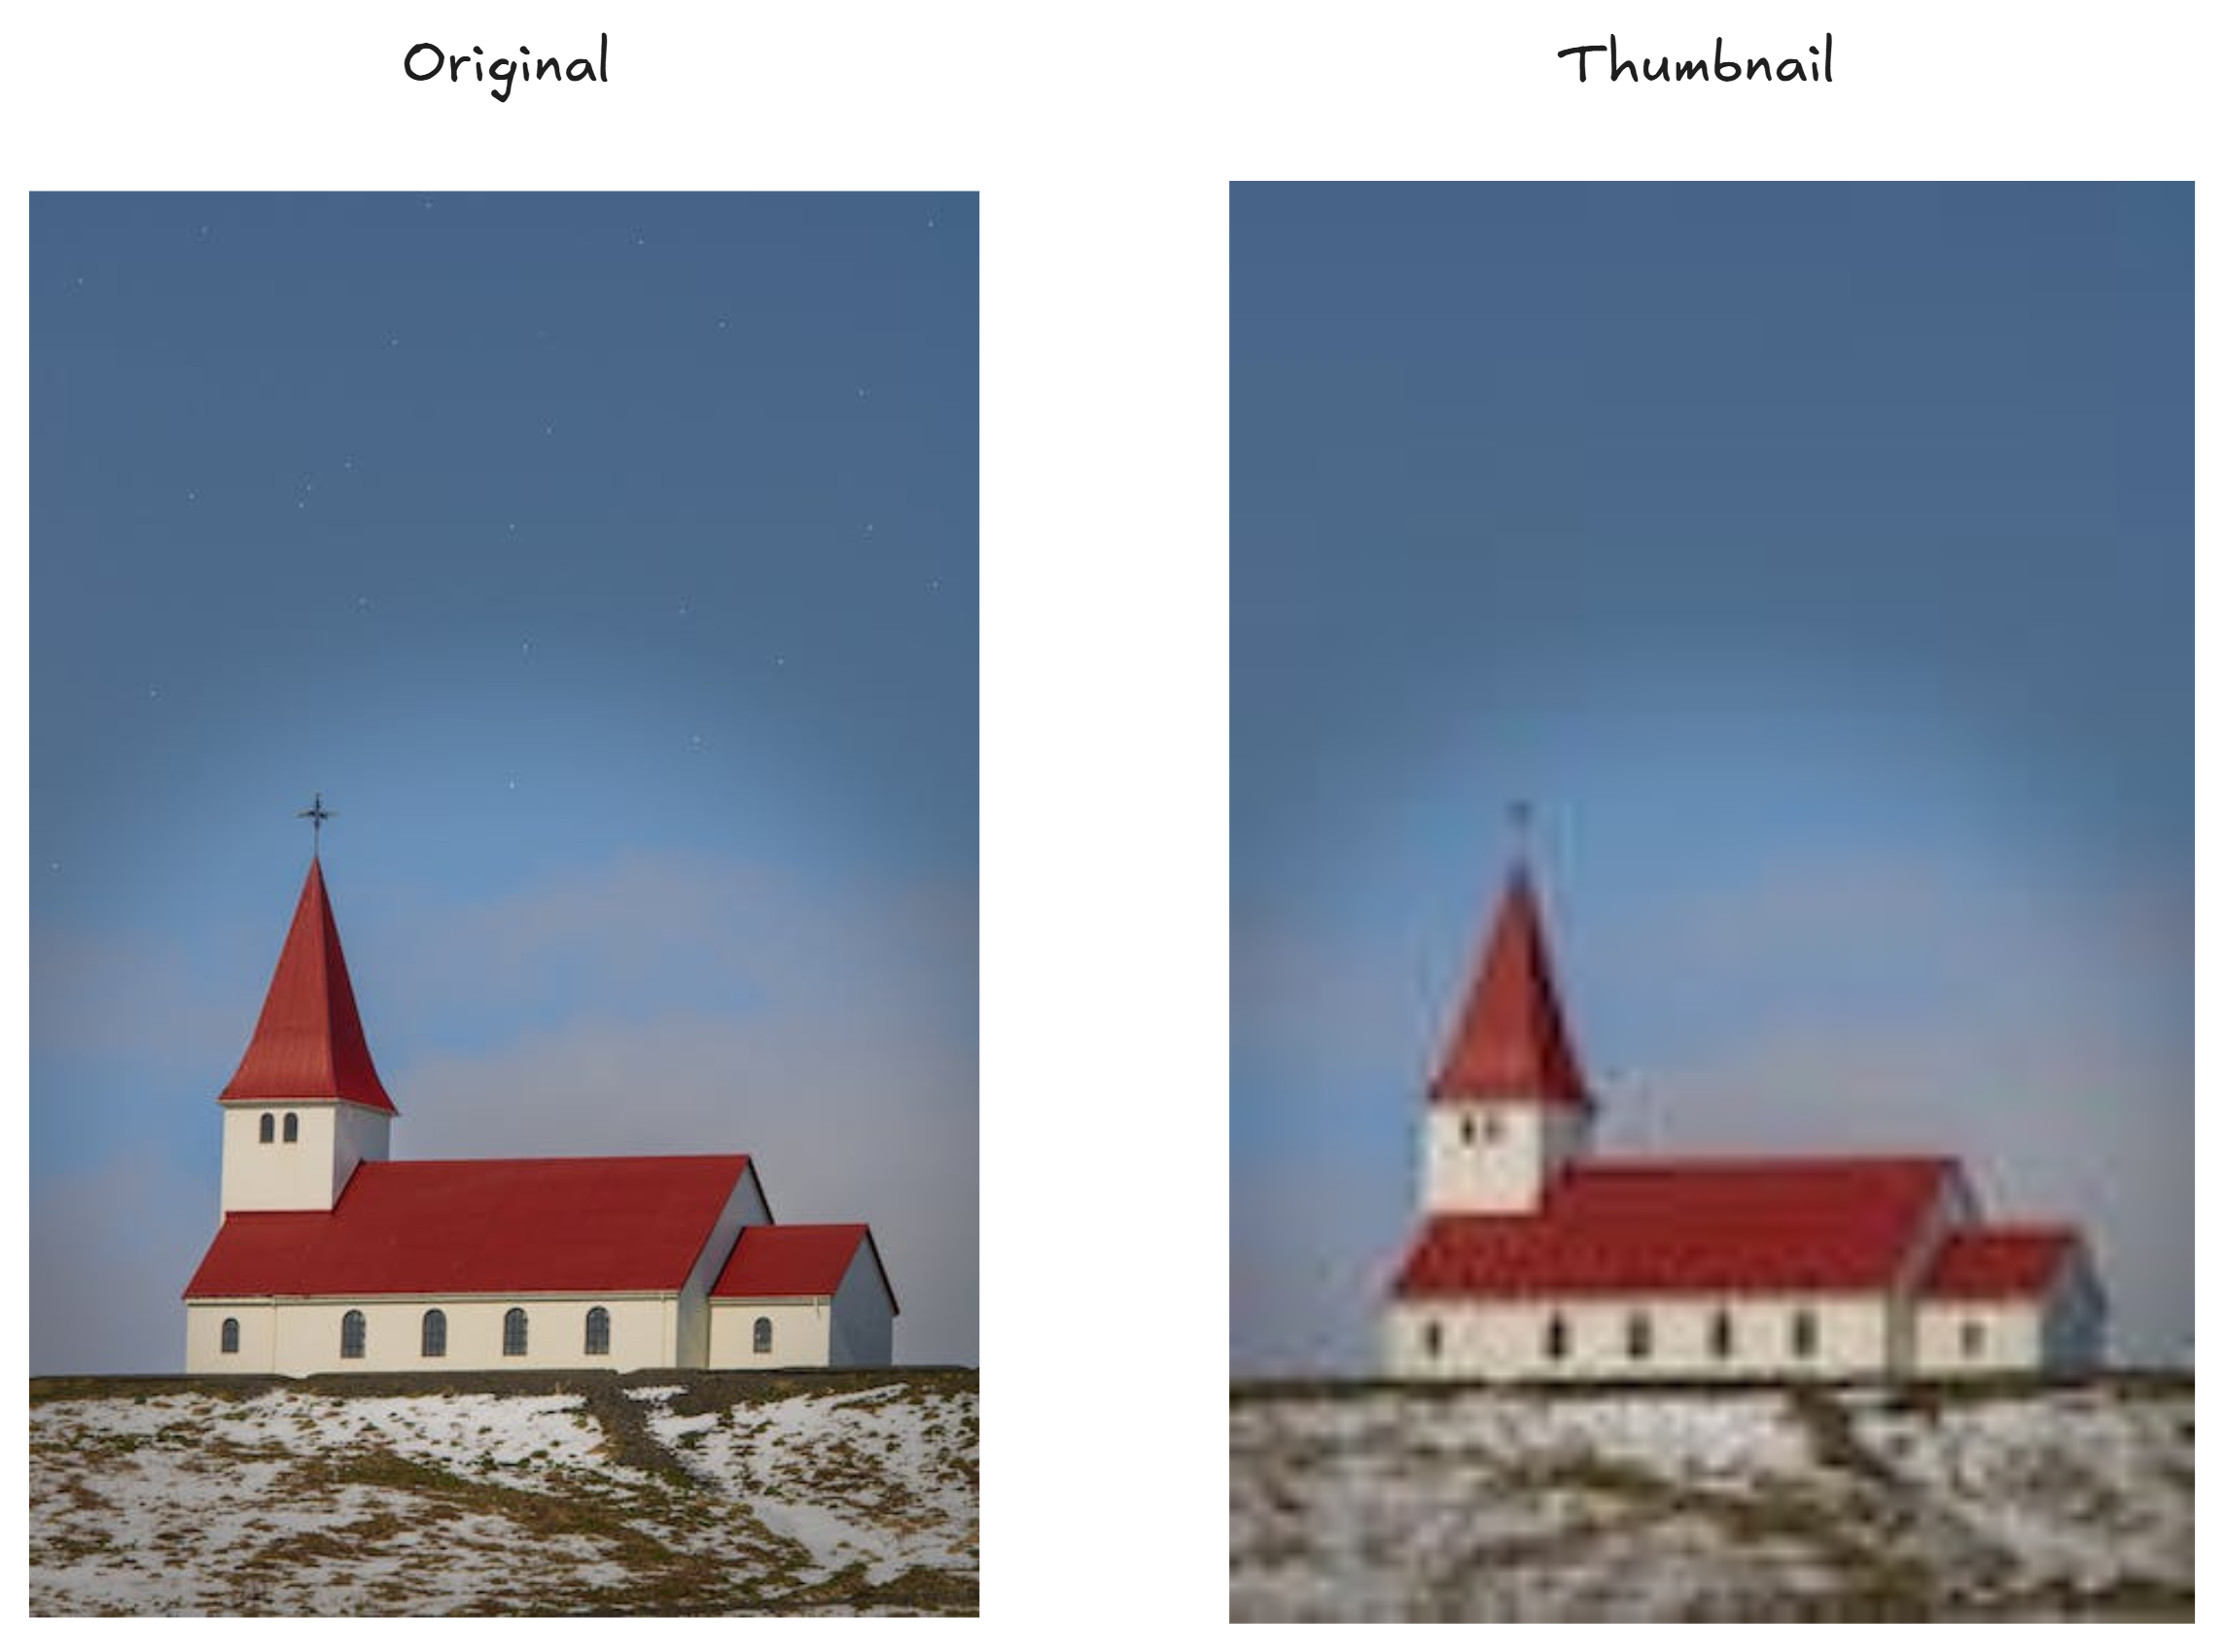
Thumbnails can replace originals because in the gallery, because of the small size they are rendered at it’s difficult to tell the difference between them. The first figure below shows a thumbnail relative to its original. The second figure below shows a thumbnail compared at the same size as the original so you can see the differences you wouldn’t normally notice when the thumbnail is displayed in the photo gallery.
The original and thumbnail side-by-side so you can see the differences. Note how the thumbnail is not as good a quality as the original - but this isn’t very noticeable because the thumbnail will only ever appear on screen at a small size.
The code below shows how a thumbnail is loaded from the backend into an object URL and rendered into the DOM. The reason we use an object URL is to separate loading from display. This makes it easier to add our authentication token to the HTTP request. The separation also makes it easy to add local caching of thumbnails. You could use a data URL, but using an object URL is more performant because it is loaded from a blob of binary data rather than having to parse base64 encoded data.
Loading the thumbnail from the backend to an “object URL” to render as an image in the gallery
import React, { useEffect, useState } from "react";
import axios from "axios";

async function loadAsset(assetId) {

  const url = `/asset?id=${assetId}`;

  // Gets the photo from the backend as a "blob" of data.
  const response = await axios.get(url, {
    responseType: "blob", // Get the response as a blob.
    headers: {
      // Add your auth token here.
    },
  });

  // Returns the photo as an object URL.
  return URL.createObjectURL(response.data);
}

//
// Renders the photo in the gallery.
//
export function GalleryImage({ asset}) {

  const [thumbObjectUrl, setThumbObjectUrl] = useState(undefined);

  useEffect(() => {
    // Loads the thumbnail when the component mounts.
    loadAsset(asset.id)
      .then((objectUrl) => {
        if (objectUrl) {
          // Set the object URL in the state and trigger a re-render.
          setThumbObjectUrl(objectUrl);
        }
      })
      .catch((error) => {
        console.error("Error loading asset:", error);
      });

    return () => {
      if (thumbObjectUrl) {
        // Unloads the object URL when the component unmounts.
        URL.revokeObjectURL(thumbObjectUrl);
      }
    }
  }, []);

  return (
    <>
      {thumbObjectUrl
        && <img
          src={thumbObjectUrl} // Provides the object URL as the image source.
          />
      }
    </>
  );
}
Micro Thumbnails
So it turns out that regular thumbnails loaded from the backend are not quite enough to get the fast, near instant, load that I had wanted for my photo gallery. When navigating to an arbitrary page in the gallery it was still very noticeable that photos were popping in one at time as they were loaded. It was still a jarring experience for the user.
So I came up with a new type of thumbnail, that I call the “micro thumbnail”. It’s smaller than a regular thumbnail and you can see the difference in resolution in the figure below. The resolution is so small that it is noticeably blurry even when rendered at the small size in the gallery. So the micro thumbnail isn’t a replacement for the regular thumbnail, its just a stepping stone to display while the regular thumbnail is being loaded.
A normal thumbnail and micro thumbnail side-by-side so you can see the differences. The size and quality of the micro thumbnail is even further reduced - but it won’t be very noticeable because the micro thumbnail will only be shown for a moment while the normal thumbnail is loaded.
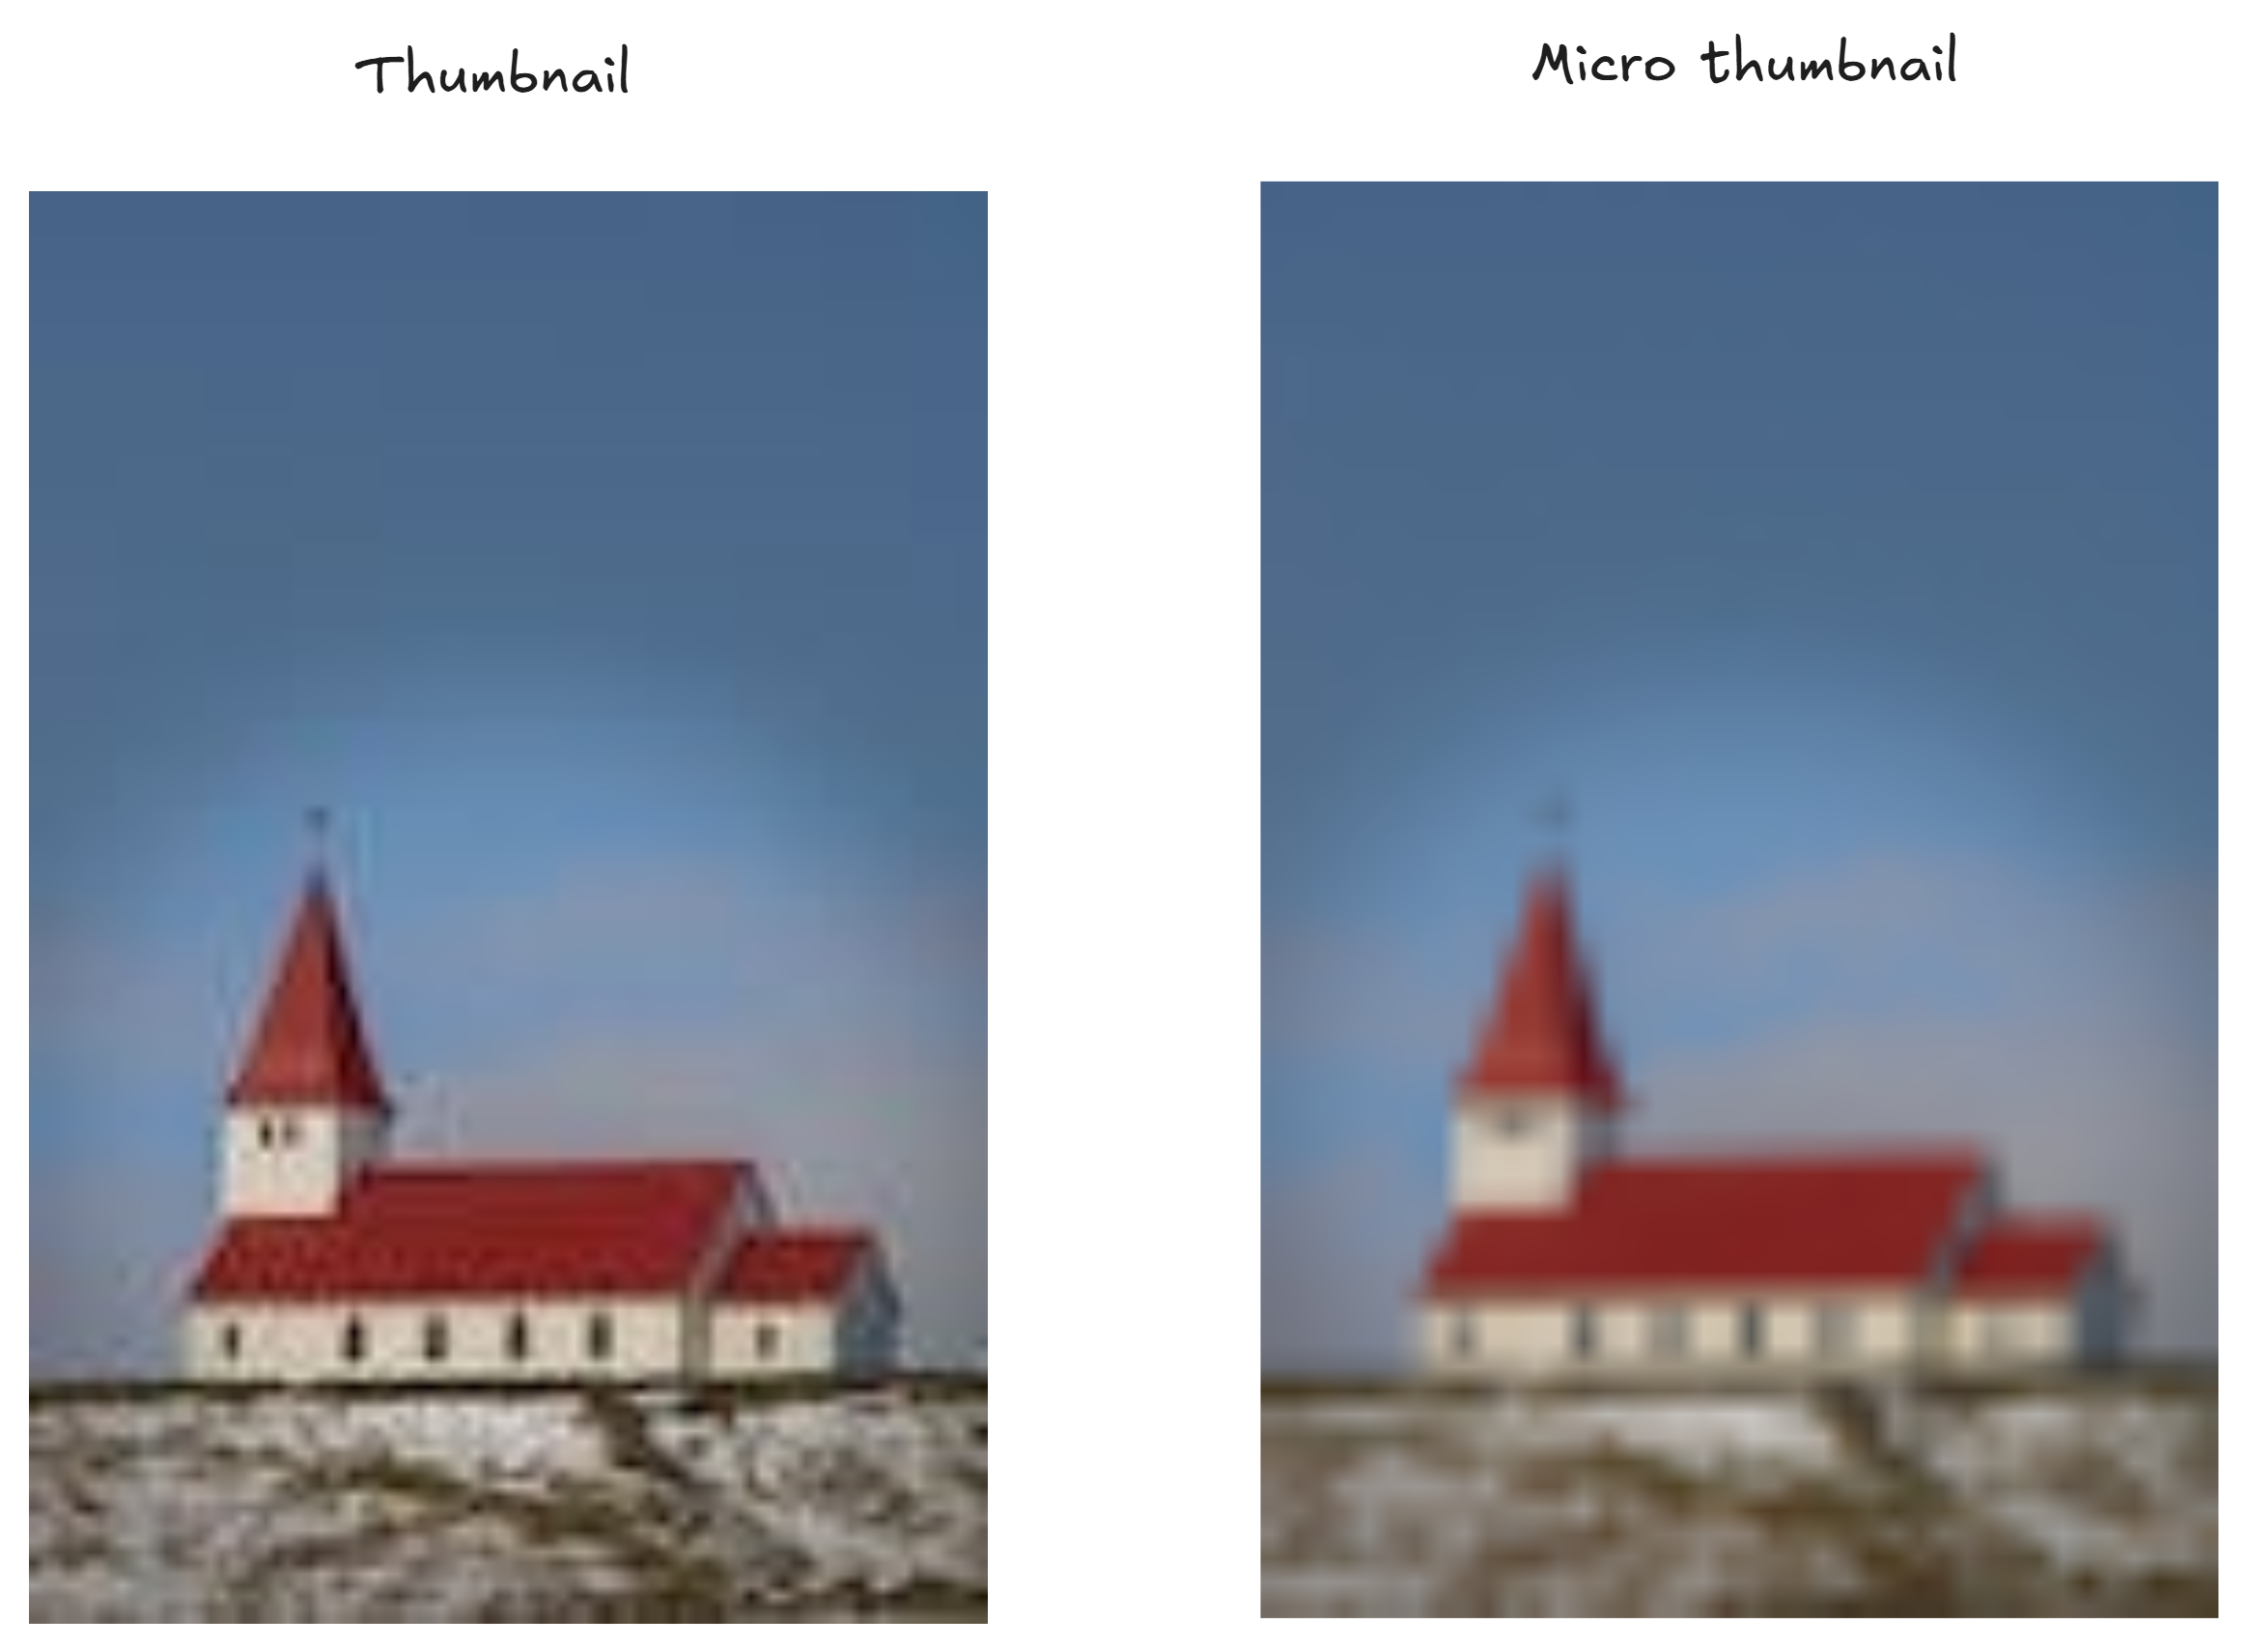
What makes micro thumbnails fast to display is not the size. If we were loading micro thumbnails from the backend like how we load regular thumbnails, there would still be a noticeable loading delay before the micros are rendered. The reason micros need to be smaller is not so they load quicker, it is so they can be embedded in the database record with the least impact on the size of the database. Each database record contains the base64-encoded image for its micro thumbnail.
So as soon as the database record for a photo is loaded from the backend into the frontend, the image data for the micro thumbnail is already present and can be displayed immediately. So as pages of photo metadata (the database records for the photos) are downloaded into the frontend there are also pages of micro thumbnails waiting and ready to be displayed in the browser. Now, when we render a photo in the gallery, there is no extra delay required to retrieve the micro thumbnail from the backend, even though we still need to then retrieve the regular thumbnail as well.
The code below shows how a micro thumbnail is converted to a data URL and then rendered into the DOM to cover the short moment of time while the regular thumbnail is loading. A data URL is used for the micro thumbnail because the data is already retrieved in base64 format from the backend as part of the database record. Using an object URL in this situation would just make loading of the micro thumbnail slower because we’d have to transform the base64 data into a binary blob before loading it into the object URL. So using a data URL is the most performant way to load the image data in this situation.
Loading the micro thumbnail from the asset to a “data URL” to render as an image in the gallery
// --snip-- Imports

//
// Renders the photo in the gallery.
//
export function GalleryImage({ asset }) {

  const [thumbObjectUrl, setThumbObjectUrl] = useState(undefined);


  // Creates a data URL from the micro thumbnail.
  const [microDataUrl, setMicroDataUrl]
    = useState(`data:image/jpeg;base64,${asset.micro}`);

  useEffect(() => {
    loadAsset(asset.id) // Loads the regular thumbnail.
      .then((objectUrl) => {
        if (objectUrl) {
          setThumbObjectUrl(objectUrl); // Sets the object URL and re-render.
           setTimeout(() => {
              setMicroDataUrl(undefined); // Unloads the micro thumbnail.
          }, 100)
        }
      })
      .catch((error) => {
        // --snip--
      });

    return () => {
      if (thumbObjectUrl) {
        URL.revokeObjectURL(thumbObjectUrl);
      }
    }
  }, []);

  return (
    <>
      {microDataUrl // Renders the micro thumbnail immediately.
        && <img
          src= {microDataUrl} // Provides the micro data URL as the image source.
          // --snip-- Omits absolute positioning.
          />
      }

      {thumbObjectUrl \// Renders the normal thumbnail after it has loaded.
        && <img
          src={thumbObjectUrl}
          // --snip-- Omits absolute positioning.
          />
      }
    </>
  );
}
Embedding micro thumbnails in each database record has a cost. Each database record is now substantially bigger because of the base64-encoded image it contains. This is a trade-off that I was willing to make in order to have near instant loading for any page of the gallery.
Preview colors
So it turns out that micro thumbnails are not quite enough to achieve the appearance of being able to instantly load any arbitrary gallery page. Even though it only takes microseconds to load an image from a micro thumbnail data URL, the momentary empty screen that it causes is still a very noticeable flicker during page loading.
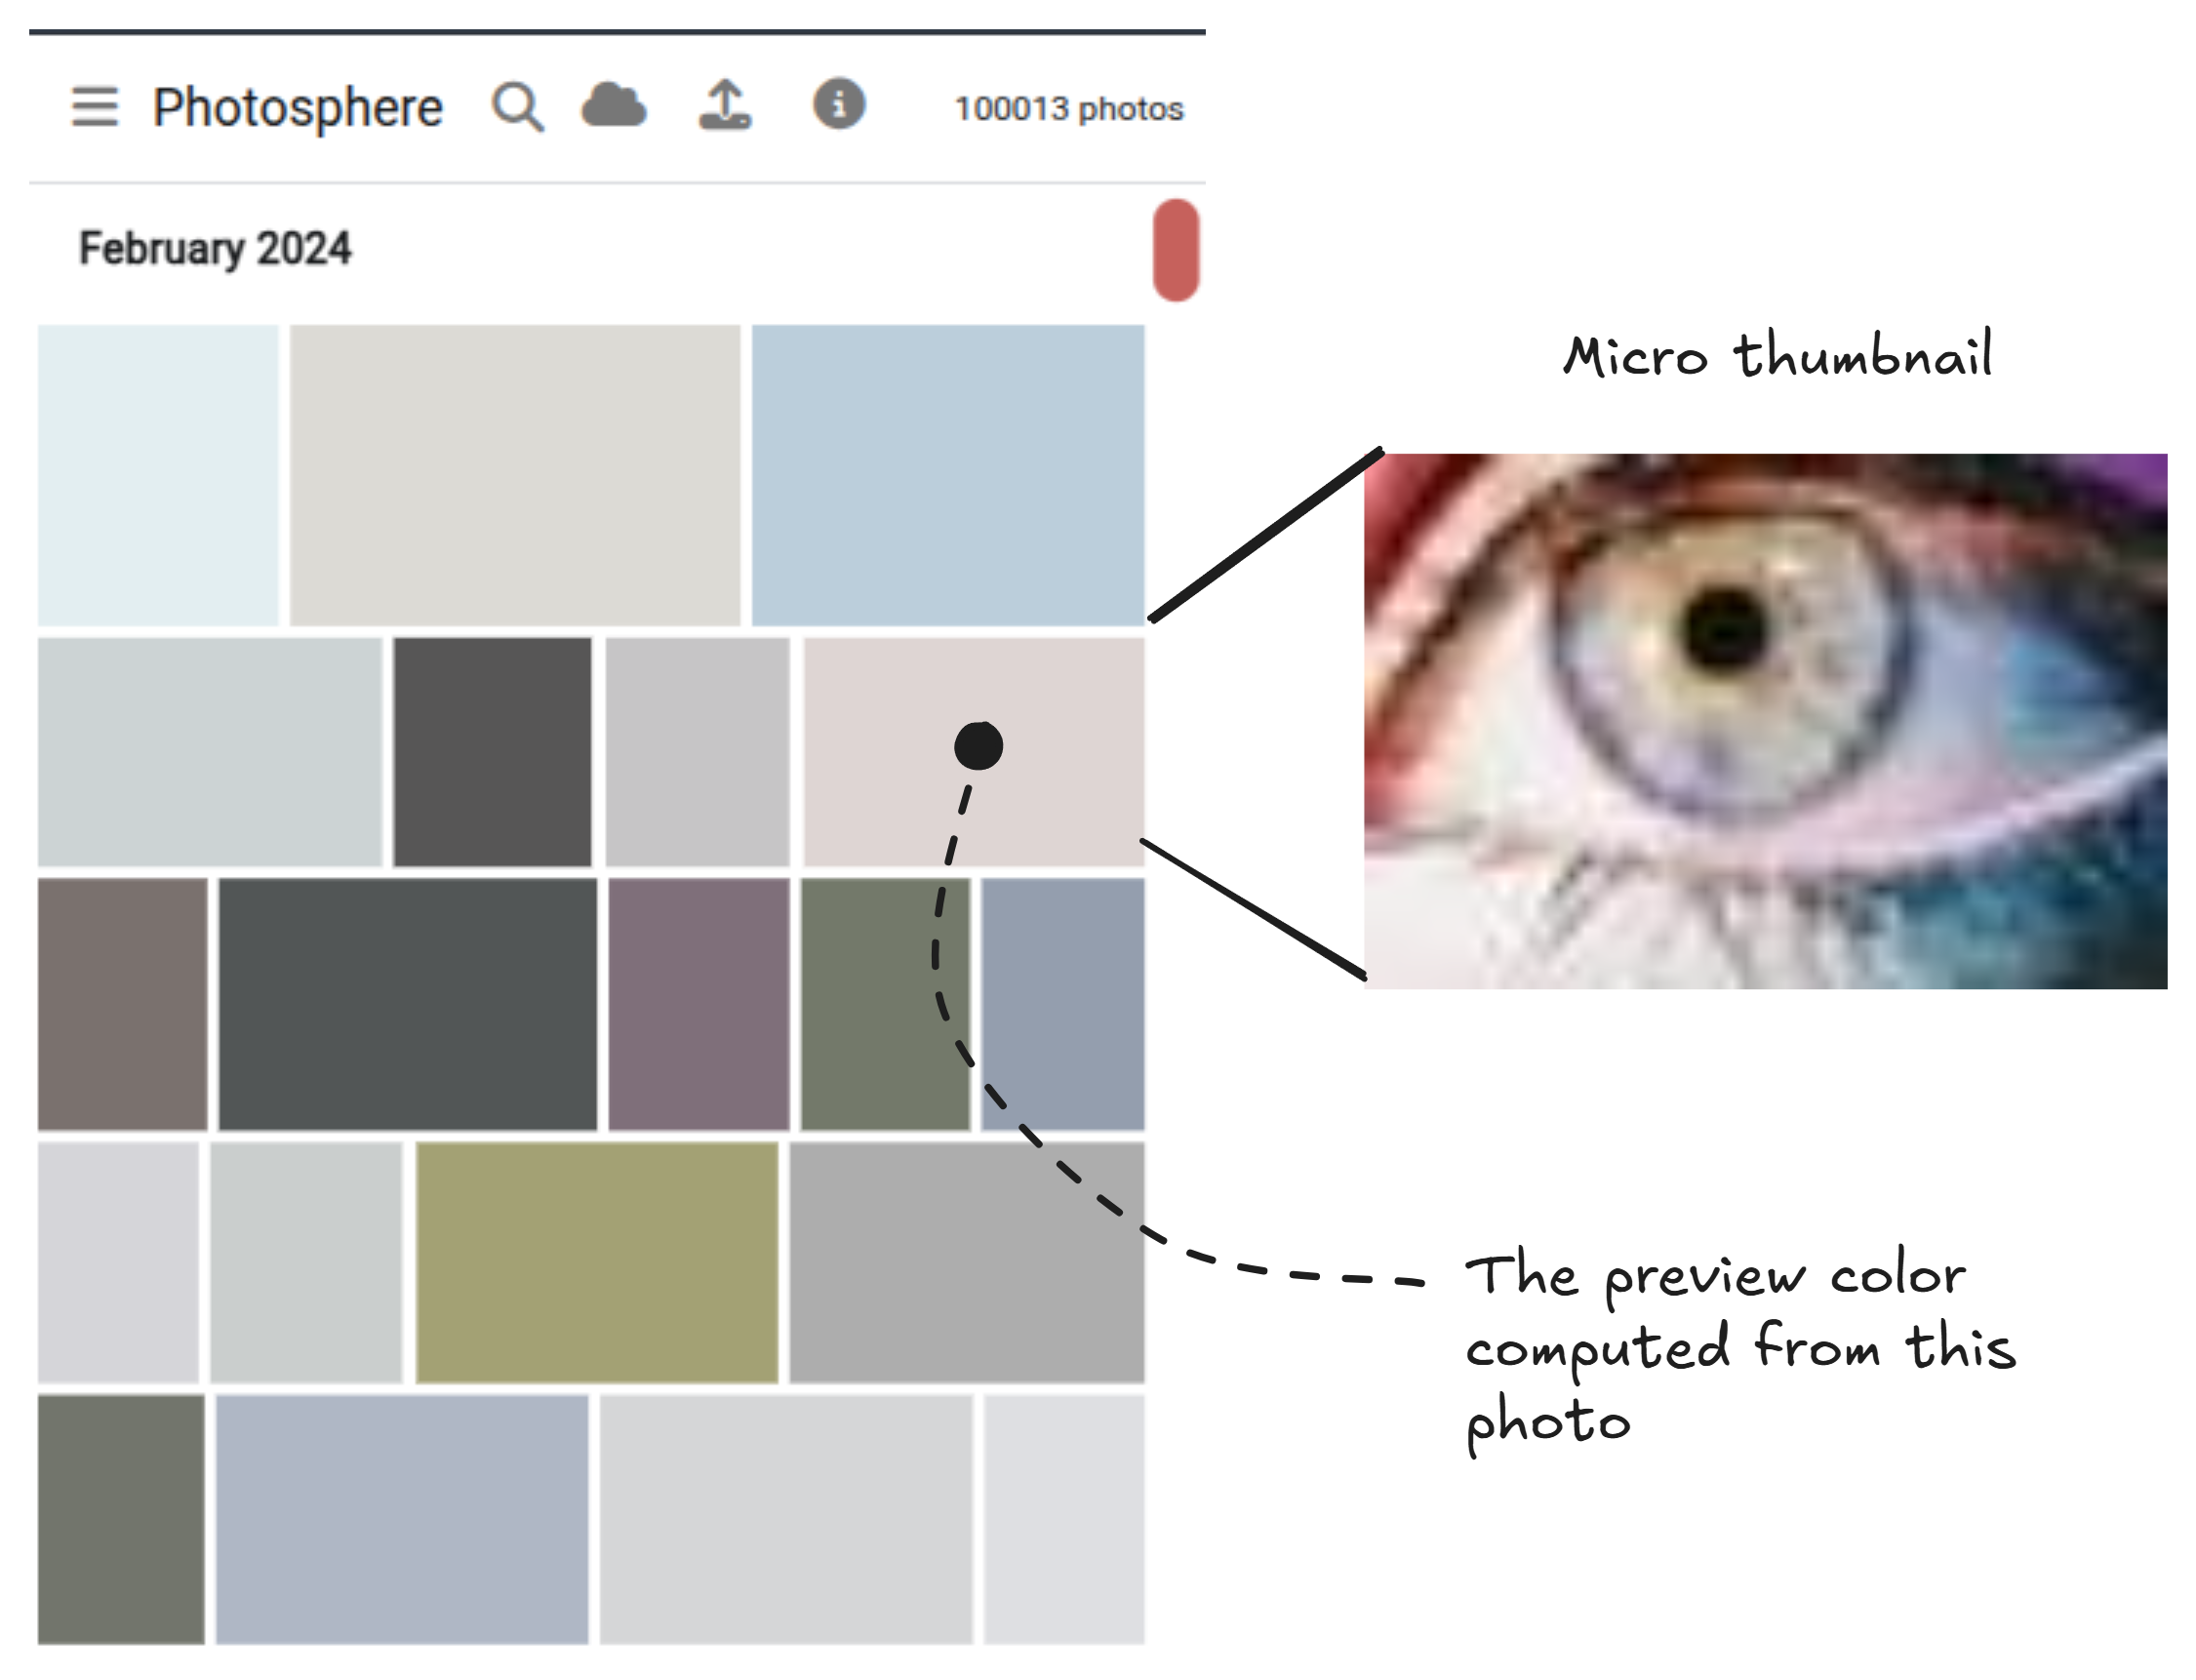
What can be done about it? To fill the gap of the “empty screen” I decided to first display a page of colored squares that vaguely represent each photo in the gallery. You can see how these “preview colors” look in the screenshot below.
The implementation of preview colors is fairly simple: setting a background color for each micro thumbnail that is representative of the original photo. I use Color Thief to extract the dominant color of the micro thumbnail and store that in the database record of each photo (alongside the micro thumbnail itself) so that the preview color for the photo is instantly available when the photo needs to be rendered.
A page full of “preview colors” shown next to a micro thumbnail for comparison of its color.
Thumbnail Progression
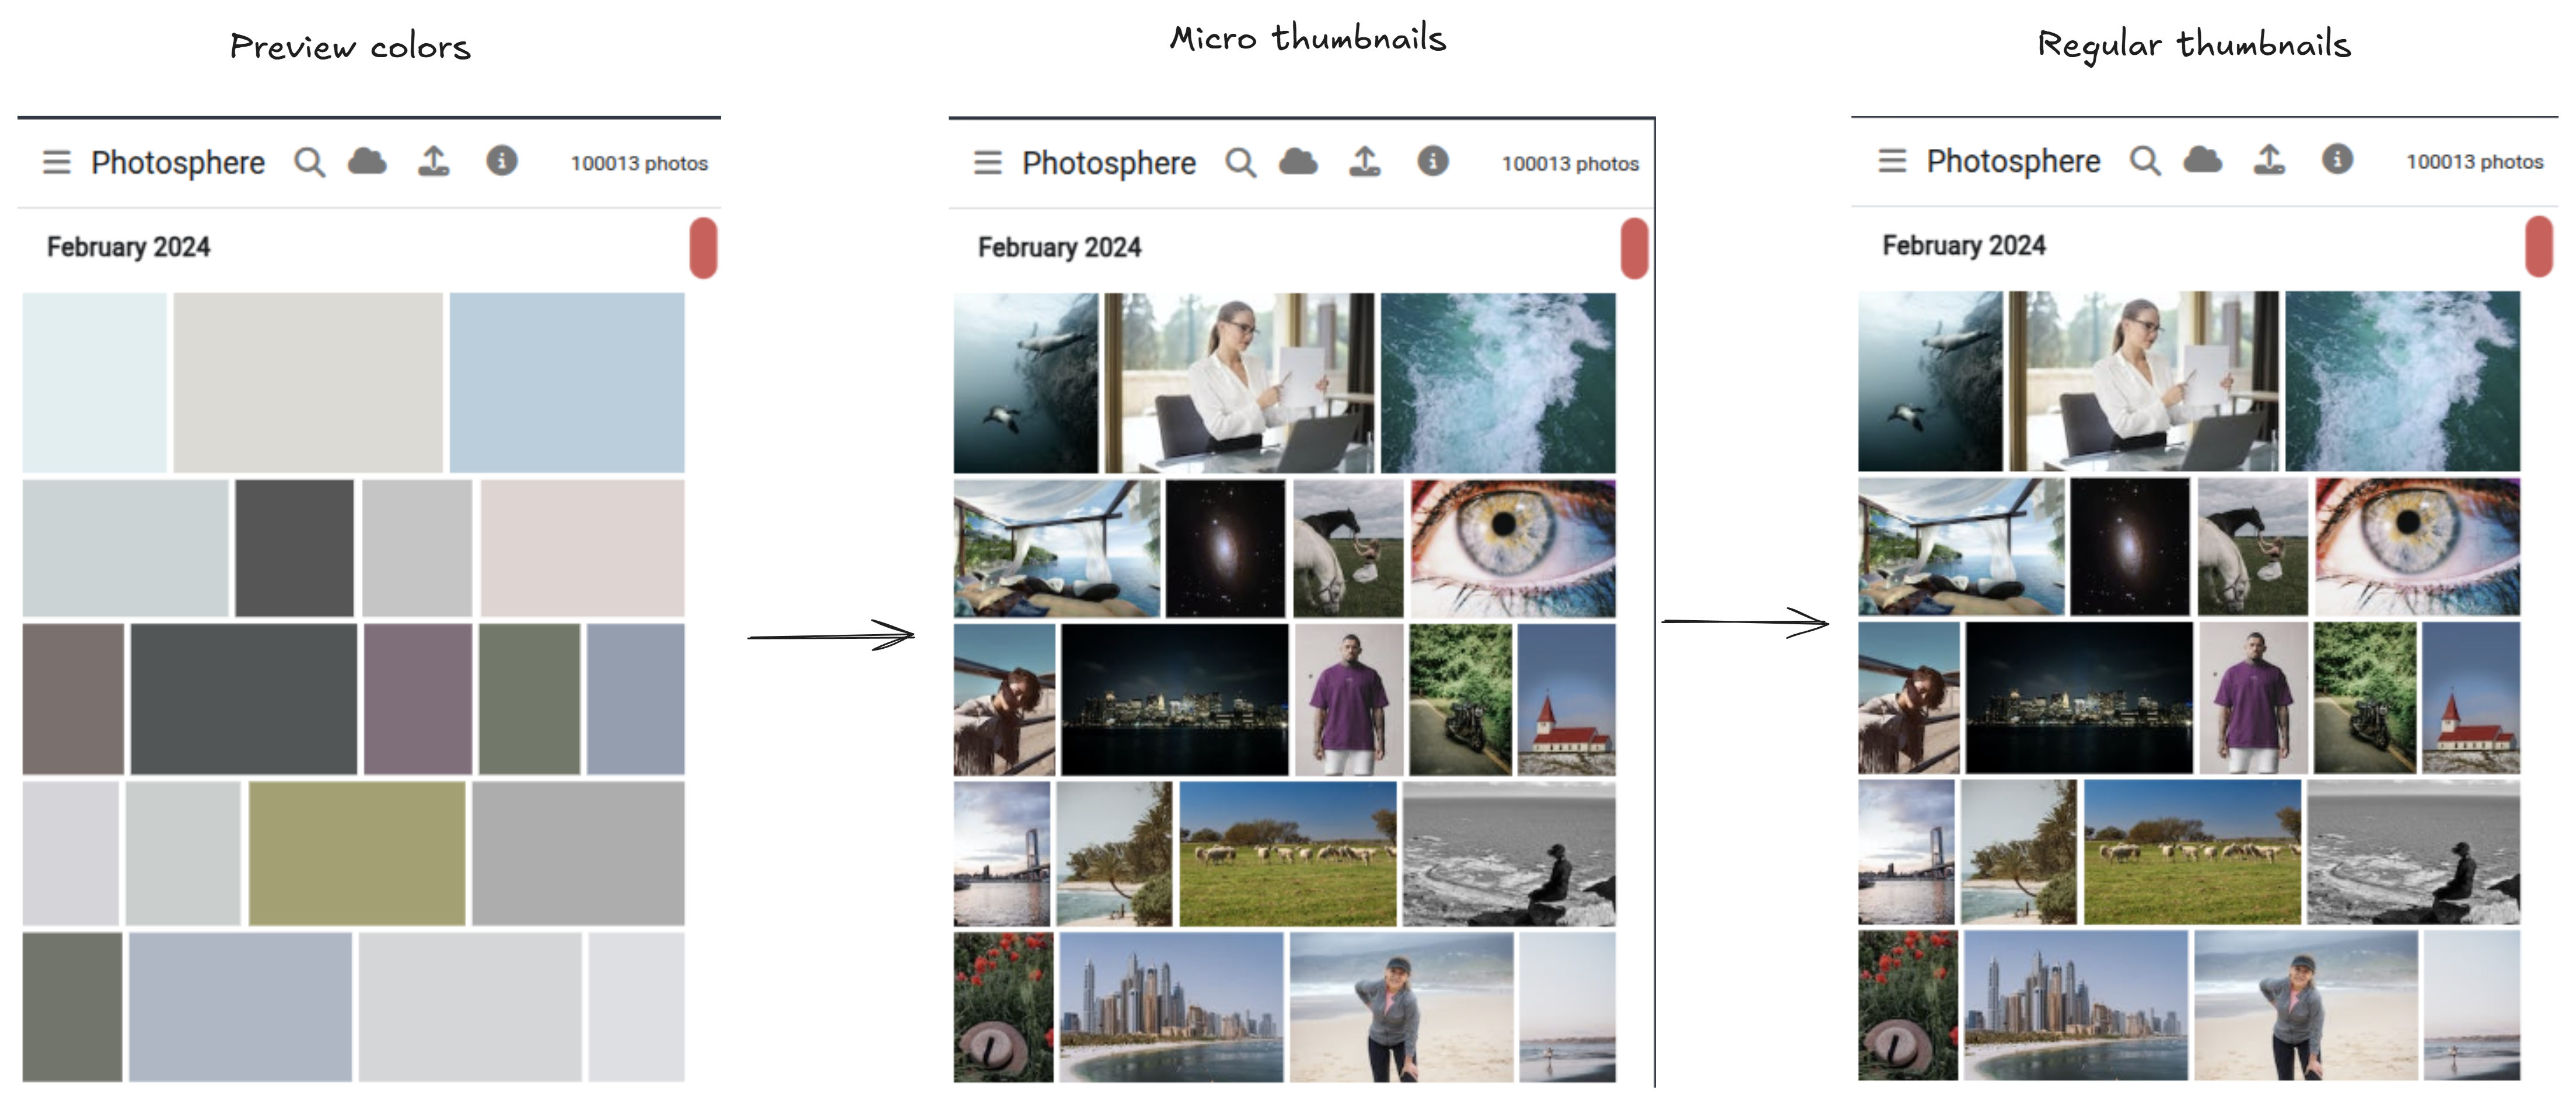
The preview colors cover the moment of the empty screen before the micro thumbnails are loaded, lessening the flicker caused by the empty screen and making the perceived loading time almost nothing.
You can see the progression in the figure below. We load the preview colors first, these are visible in the DOM from the moment they are rendered. Straight up we also display the micro thumbnails, but these take a few moments to actually appear on screen. Lastly we load the regular thumbnails which take much more time because each one is loaded individually from the backend.
The progression of low to higher resolution images starting with the preview colors, then the micro thumbnails and finally the regular thumbnails.
Further Performance Optimizations
There is still more that I did for enhanced performance, although we are really getting beyond what was needed here.
Caching Thumbnails
I decided to cache thumbnails in indexeddb to reduce the load time and network bandwidth for subsequent reloads of a gallery. If you have viewed a gallery recently, it will still be cached in your local storage and when viewing it again, it loads so much faster.
What makes this possible is that thumbnails downloaded from the backend are retrieved as binary blogs of data that can easily be stored in and recovered from indexedb as necessary.
Preloading Database Records
My implementation of the photo gallery has a custom scrollbar that allows the user to instantly jump to any page of the gallery (or any point in the chronology of their gallery). If only one page of the gallery were loaded at time a navigation to another page would cause loading of new data from the backend. This loading of data is obviously antagonistic to my goal of allowing instant loading.
I counter it by incrementally preloading all database records for the entire gallery from the backend. You might think this was expensive, but the browser can easily hold 100k gallery records in its memory without skipping a beat.
Of course we don’t want to wait until the whole gallery is loaded before the user can view and interact with it. So the first thing we must do is load the first page of photos - this gives the user something to look at and interact with while the remaining pages are incrementally loaded.
Preloading all the database records enables everything else:
- The user can instantly jump to any page in the gallery.
- Preview colors and micro thumbnails (embedded in the already downloaded database records) are already available and can be rendered in the browser.
- In addition, searching for photos and videos in the gallery is practically instant given that they are all loaded into memory.
Service Worker
To get that last ounce of performance I used a service worker to cache the entire web page in the browser’s local storage. This means that on reload of the photo gallery, the web page is already local, the thumbnails for at least the first page are local, we only need to pull the first page of records from the backend and the gallery appears to be loaded even though only the first page is interactive. In the subsequent moments the remaining pages of the gallery are pulled down and the entire gallery is interactive.
Caching the Entire Gallery
You might have noticed there is one further step that I didn’t take.
Well, in fact I have already experimented with caching the entire gallery (all database records) in indexedb. What this means is that subsequent loads of the gallery are entirely local. The entire web page cached, the thumbnails are cached, but not only that all the database records are also cached.
The current version of Photosphere doesn’t do this, only just an experiment I tried in the past. But I think the next step for Photosphere is to enable this full local caching of database records. Doing this will achieve something that I most desire - be able to view and edit my photo gallery while I’m offline (say when I’m travelling). Unfortunately synchronizing local edits to the backend is a rather complex job which I have talked about in https://blog.appsignal.com/2025/03/12/building-robust-data-synchronization-code-in-nodejs.html
Stay tuned though, in a future blog post I’ll be integrating that synchronization engine into Photosphere and transforming it into a local-first application.
Conclusion
This article shows that rendering huge amounts of data in the browser, in this case 100,000 photos is possible. But you’ll need to use a few tricks for good performance and a seamless user experience.
The common and obvious choices are to only render what you need and to use thumbnail versions of the photos. We should only render the portion of the gallery that is visible to the user. The browser won’t render 100,000 photos, but it can easily render the tens of photos that are visible in the currently viewed page.
But I also found other ways to help hide the loading of new pages. Preloading and caching were important to ensure data is available instantly. Preview colors and micro thumbnails were useful so that a version of each photo is instantly available.
The sum total is that we fool the user (really we fool their eyes) into believing that the load time for any given page of the gallery is not existent. It seems almost impossible to perfect something like this, but that’s not the aim. All we really want is to provide a better experience to our users.