With TypeScript decorators and the JavaScript Proxy class — it’s easier than you think
Have you tried using dependency injection (DI) frameworks only to be bowled over by their complexity and the difficulty of trying to bend them to your will? Use some of the popular DI libraries and you’d be forgiven for thinking it’s some branch of rocket science.
Well, I’d like to show that creating or using a DI library doesn’t have to be as complicated or difficult as you might think. After struggling through a couple of popular DI frameworks and not getting what I wanted, I decided to write my own.
In this blog post, I’d like to show you what’s possible to achieve in a DI library in TypeScript in fewer than 300 lines of code (many of which are logging and comments).
I created my own DI library for TypeScript that I use in Data-Forge Notebook, which runs on Electron with a user interface built using React. I wanted a DI library that worked well for both React and for generic TypeScript code, and I wanted something that was simple to understand and simple to use, but still very flexible.
I’ve now open-sourced my DI library, and it’s called Fusion. You can find it on npm and GitHub. Please download a copy of the code so you can follow along with this blog post.
What is dependency injection?
Have you ever struggled to keep your application working as it grows and its complexity ramps up?
All software is composed of interacting components that are wired together in particular ways. As the number of interacting components grows, the wiring and the number of connections between components grows exponentially (a phenomenon known as Metcalfe’s law).
Do you really want to look after all that complicated wiring yourself? This is what automated dependency injection will do for you.
Dependency injection is a design pattern for automatically wiring together the components of your complex application. This is especially useful when writing dependencies through to the leaves of a deep and complex user interface hierarchy, which you can imagine after looking at figure 1.

Figure 1: Using dependency injection to directly wire dependencies through to a deep and complex UI component hierarchy.
Why use dependency injection?
Dependency injection is useful for a variety of reasons:
- The concerns of dependency use and dependency resolution are separated
- It encourages separation of concerns and loose coupling between components
- It automates the wiring of components in your application, a task that can otherwise be very complicated
- Dependencies are easier to mock for unit testing
- It facilitates fast rewiring of components, which makes refactoring quicker and safer
- It allows for abstractions that help reuse the same codebase across multiple platforms, environments, or types of processes
- It can be used to centralize or externalize the configuration of your application, although that’s not something that Fusion supports at this stage
Dependency injection is also simply a clean and elegant way to structure your application. Using DI, you’ll spend less time concerned with system wiring and more time developing features.
What are the alternatives?
Before striking out and writing your own code library, you should always consider the alternatives first. How else can we wire up dependencies?
Instead of injecting our dependencies, we can create them directly in the code where they are needed. We don’t want to do that, though, because that means we can’t share dependencies, and it’s also impossible to replace the dependencies with mock versions for unit testing.
Another option is to directly access singletons, but that has the exact same consequence with the addition of hard-linked global variables.
A simpler alternative to DI that you might like is called the service locator pattern. It’s similar to DI but much less automatic. It’s still a great pattern to start with if you think DI is too complicated.
Of course, there are plenty of existing DI libraries you could use. I just searched npm and found 1,778 packages! Surely there is something here that I can use?
Well, like I said, I’ve tried some of the popular libraries and found them wanting. They are often very convoluted and can be difficult to bend to your needs.
I wanted something much simpler. I wanted a DI library that I could make work just the way I wanted. That’s why I created Fusion. Now I’d like to show that rolling your own simple DI library is not that difficult.
Dependency injection with TypeScript decorators
Fusion is built on TypeScript decorators and the JavaScript Proxy class. It creates a proxy for each class to intercept calls to the constructor. The proxy automatically injects dependencies just after an object is constructed, but just before the object is returned to be used by the caller.
As an example, we’ll use a React component called SetupWindow. Figure 2 indicates how the dependency injection system provides values for the properties of our class. This is a simplified but real example taken from Data-Forge Notebook. Please note that Fusion works with any TypeScript class — I’m demonstrating with React to show that it can be done.
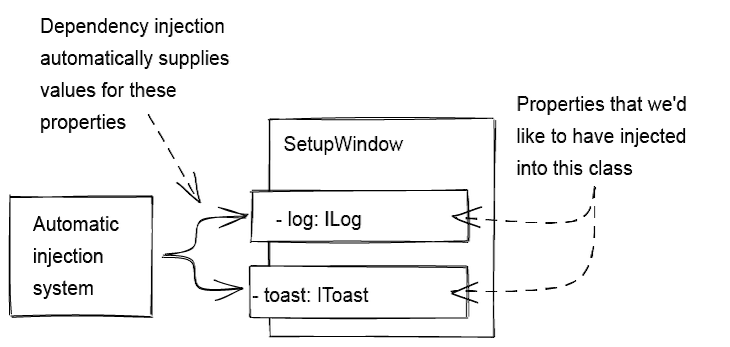
Figure 2: Dependency injection automatically provides values for certain properties in our classes.
Marking up a class as injectable
To start, we must be able mark up a class for injection. The example SetupWindow class is shown in listing 1. We use the InjectClass decorator to mark the class as injectable. This decorator is what creates the proxy constructor.
Next in listing 1, we use the InjectProperty decorator to mark the properties of the class that are to be injected. For simplicity, magic strings are used to identify the dependency to be injected.
If you take issue with the use of magic strings, please don’t be concerned; I just want to keep things simple for the moment, then at the end of this post, I’ll give you a better solution.
In this example, the log and toast properties are being injected with dependencies that are implementations of the interfaces ILog and IToast. Then, for the remainder of the class — at least after the constructor — we can make use of these properties, e.g., calling functions on them.
Listing 1: Marking a class as injectable
import { InjectableClass, InjectProperty } from "@codecapers/fusion"

@InjectableClass()
export class SetupWindow extends React.Component<{},{}> {

    @InjectProperty("ILog")
    log!: ILog;

    @InjectProperty("IToast")
    toast!: IToast;

    constructor(props: any) {
        super(props);

        // ... dependencies can't be used in the constructor ...
    }

    someFunction(): void {
        // Make use of dependencies.
        this.log.info("All went well.");

        this.toast.success("Operation was a success!");
    }

    // ... other code goes here ...
}
Did you notice the exclamation mark after the name of each property? That’s so that TypeScript doesn’t give us warnings about uninitialized variables. From the compiler’s perspective, these properties are never actually initialized. They will be, of course, but TypeScript doesn’t know that, so we use the exclamation to suppress TypeScript’s warnings.
That’s all you need to do to make a class injectable. Now, when you instantiate this class (shown in listing 2), the proxy constructor is invoked, and the dependencies are automatically resolved.
Listing 2: Instantiating a React component in a TSX file
<SetupWindow />Alternatively, if you are using a normal TypeScript class and not a React component, you would instantiate with the new keyword as shown in listing 3. Either way, the proxy constructor automatically resolves the dependencies.
Listing 3: Instantiating a regular TypeScript with the new keyword
const window = new SetupWindow();Recording injectable properties
The InjectProperty decorator marks properties as injectable. You can see the code for it in listing 4.
InjectProperty is a function that is passed the ID of the dependency that is to be injected. This is a factory function that creates the decorator. It is actually the inner function in listing 4 that is the decorator, and it is called for each property marked with it.
We record injectable properties so they can be resolved later when instances of the class are constructed. The __injections__ array is attached to the prototype of the class and collects the details (property name and dependency ID) required for property injection.
Listing 4: A TypeScript decorator to record injectable properties
export function InjectProperty(dependencyId: string): Function {
    // Returns a function that is invoked for the property that is to be injected.
    return (prototype: any, propertyName: string): void => {
        if (!prototype.__injections__) {
            // Record properties to be injected against the constructor prototype.
            prototype.__injections__ = [];
        }

        // Record injections to be resolved later when an instance is created.
        prototype.__injections__.push([ propertyName, dependencyId ]);
    };
}
Making a class injectable
The InjectableClass decorator marks a class as injectable. You can see the code for it in listing 5. Again, this is a factory function that produces the actual decorator. It doesn’t take any parameters, so technically, we don’t really need the factory function, but it’s nice to be consistent with the other decorators in Fusion.
InjectableClass returns makeConstructorInjectable; this function is the actual decorator. It’s not an anonymous function, like we used in listing 4. Instead, this function has a name because we’d like to reuse it internally within Fusion.
Listing 5: TypeScript decorator that makes a class injectable
export function InjectableClass(): Function {
    // Returns a factory function that creates a proxy constructor.
    return makeConstructorInjectable;
}
Proxying an injectable object
To make dependency injection happen automatically, we need to create a proxy for the original constructor. We wrap it in a JavaScript Proxy instance as shown in figure 3. The construct function of the proxyHandler intercepts calls to the original constructor so we can insert our own custom logic.
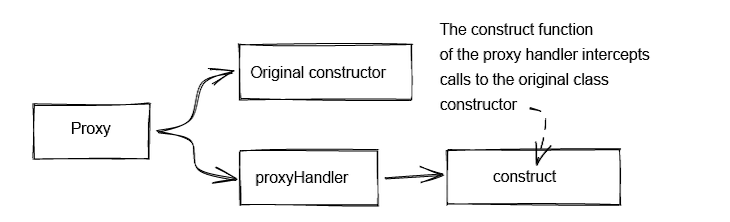
Figure 3: Using a JavaScript Proxy instance to interface calls to the original constructor.
Listing 6 shows how the makeConstructorInjectable function creates the proxy constructor. Its only parameter is origConstructor. As the name suggests, this is the original constructor for the class that we need to proxy.
Listing 6: Creating a proxy constructor to handle automatic injections
//
// Takes a constructor and makes it 'injectable'.
// Wraps the constructor in a proxy that handles injecting dependencies.
//
function makeConstructorInjectable(origConstructor: Function): Function {

    if (!origConstructor.prototype.__injections__) {
        // Record properties to be injected against the constructor prototype.
        origConstructor.prototype.__injections__ = [];
    }

    const proxyHandler = {
        // Intercepts the call to the original class constructor.
        construct(target: any, args: any[], newTarget: any) {
            // ... body of this function shown in listing 7 ...
        }
    };

    // Wrap the original constructor in a proxy.
    // Use the proxy to inject dependencies.
    // Returns the proxy constructor to use in place of the original constructor.
    return new Proxy(origConstructor, proxyHandler);
}
Listing 7 shows the construct function that intercepts the call to the original constructor. We use the function Reflect.construct to call the target constructor and instantiate the object. This is like using the new keyword to create an object but is specifically designed to work with proxies.
Listing 7: Intercepting the call to the original class constructor to resolve dependencies
function construct(target: any, args: any[], newTarget: any) {

    // Construct the object ...
    const obj = Reflect.construct(target, args, newTarget);

    try {
        // ... and then resolve property dependencies.
        const injections = origConstructor.prototype.__injections__ ;
        resolvePropertyDependencies(obj, injections);
    }
    catch (err) {
        // ... log the error ...
        throw err;
    }

    return obj;
}
Resolving dependencies
After the target object is constructed, dependencies are injected by calling resolvePropertyDependencies, which you can see in listing 8. There’s not much to it — it simply loops over the collection of injections, instantiating and injecting each one in turn.
Listing 8: Resolving dependencies for an instantiated object
function resolvePropertyDependencies(obj: any, injections: any[]): void {

    if (injections) {
        for (const injection of injections) {
            const dependencyId = injection[1];

            // Creates a new dependency instance or reuses the existing one.
            const singleton = instantiateSingleton(dependencyId);
            if (!singleton) {
                throw new Error("Failed to instantiate singleton " + dependencyId);
            }

            const propertyName = injection[0];

            // Inject the dependency into the object.
            obj[propertyName] = singleton;
        }
    }
}
The dependency to be injected is created by the call to instantiateSingleton. As the name “singleton” suggests, only a single instance of the dependency will be created; it is thereafter cached and reused.
If you are comparing listing 8 with the actual code in Fusion, you will notice a difference. The real code is actually a bit more complicated than listing 8. There’s more code because it detects circular references between dependencies. If it didn’t do that, it could get stuck in a loop. Instead, it can break the loop and report an error.
Dynamically instantiating singletons
You can see the instantiateSingleton function in listing 9. Notice singletonConstructors and instantiatedSingletons. The first is a lookup table that contains the constructors for our dependencies. The second is a lookup table for dependencies that were already created and can then be reused.
In listing 9, we reuse the function makeConstructorInjectable to make these lazily instanced singletons be injectable themselves. So our singletons can also contain injected dependencies.
Listing 9: Instantiating a singleton (or reusing one that was previously created)
//
// Constructors that can be called to instantiate singletons.
//
const singletonConstructors = new Map<string, Function>();

//
// Collection of all singletons objects that can be injected.
//
const instantiatedSingletons = new Map<string, any>();

export function instantiateSingleton<T = any>(dependencyId: string): T {
    try {
        const existingSingleton = instantiatedSingletons.get(dependencyId);
        if (existingSingleton) {
            // The singleton has previously been instantiated.
            return existingSingleton;
        }

        const singletonConstructor = singletonConstructors.get(dependencyId);
        if (!singletonConstructor) {
            // The requested constructor was not found.
            const msg = "No constructor found for singleton " + dependencyId;
            throw new Error(msg);
        }

        // Construct the singleton.
        const instantiatedSingleton =
            Reflect.construct(makeConstructorInjectable(singletonConstructor), []);

        // Cache the instantiated singleton for later reuse.
        instantiatedSingletons.set(dependencyId, instantiatedSingleton);
        return instantiatedSingleton;
    }
    catch (err) {
        log.error("Failed to instantiate singleton " + dependencyId);
        log.error(err && err.stack || err);
        throw err;
    }
}
Manually registering singletons
The remaining question, then, is how do we specify the classes to instantiate into singletons?
There are two ways. The first is by manually registering with a call to registerSingleton. There’s an example of this in listing 10.
Listing 10: Manually registering a singleton
registerSingleton("IToast", new ToastService());Manual registration is useful for:
- Explicit control over the order of initialization
- Specifying inputs via constructor arguments
- Providing different implementations depending on the circumstances
Point 3 above is very useful when you need to abstract away the differences between different platforms or processes. For example, with Data-Forge Notebook being an Electron application, its code runs in different types of processes that have significant differences. There’s the main process and the renderer process, and in addition, I have added a separate Node.js process that’s used in the background for evaluating a user’s code.
The implementations of some of the dependencies are necessarily different depending on the process they have to run in. Most of the code, however, can run on any of the processes without change. So it’s useful in a small number of cases to manually register different implementations for each process. This serves to abstract away the differences between the processes and allows me to use a common set of code across all of them.
Listing 11 shows the implementation of registerSingleton. It simply records the singleton instance so that it can later be injected as a dependency.
Listing 11: Records a previously instantiated singleton
//
// Manually registers a singleton.
//
export function registerSingleton(dependencyId: string, singleton: any): void {
    instantiatedSingletons.set(dependencyId, singleton);
}
Automatically registering singletons
Manually registering singletons is useful and occasionally necessary. Most of the time, however, a singleton will only have one implementation, and we don’t care about the order of initialization.
Getting the order of initialization right for components in your application is a tricky business and has been the source of many bugs in the past. With automated dependency injection, though, we can have our singletons created automatically just when they need to be injected.
This automatically solves the order of initialization problem for the majority of the components in our application. We are thus freed from the tyranny of worrying about the wiring of our application. We can instead focus on delivering features to our customers.
The decorator InjectableSingleton is used to mark classes that are to be lazily initialized as singletons. Listing 12 demonstrates how it’s used to annotate the Toast class that we’ll use for displaying toasts in our application.
Listing 12: Registering a singleton for lazy initialization and automatic injection
@InjectableSingleton("IToast")
export class Toast implements IToast {
    // ...
}
The implementation of InjectableSingleton in listing 13 is similar to the other decorators we’ve seen. Again, it’s a factory function that returns the actual decorator. The inner function is called for each singleton class and is passed the singleton’s constructor. Here we simply record the constructor against the dependency ID so that it can be instantiated later the first time that it is needed.
Listing 13: A TypeScript decorator that marks a class a lazily initialized singleton
//
// TypeScript decorator: Marks a class as an automatically
// created singleton that's available for injection.
//
export function InjectableSingleton(dependencyId: string): Function {
    // Returns a factory function that records the constructor of the class so that
    // it can be lazily created later as a singleton when required as a dependency.
    return (target: Function): void => {
        // Adds the singleton constructor to the set of singletons.
        singletonConstructors.set(dependencyId, target);
    }
}
Lazily initializing singletons
The last bit of code to look at in listing 14 is the code that instantiates the singleton. The function instantiateSingleton is called lazily just before the first time the singleton is needed. After creation, the singleton is then cached so that it can be reused in the future.
Listing 14: The code that “just in time” instantiates a singleton
//
// Constructors that can be called to instantiate singletons.
//
const singletonConstructors = new Map<string, Function>();

//
// Collection of all singletons objects that can be injected.
//
const instantiatedSingletons = new Map<string, any>();

//
// Instantiates a singleton.
// If it's already instantiated then the original is returned instead.
//
export function instantiateSingleton<T = any>(dependencyId: string): T {

    const existingSingleton = instantiatedSingletons.get(dependencyId);
    if (existingSingleton) {
        // The singleton has previously been instantiated.
        return existingSingleton;
    }

    const singletonConstructor = singletonConstructors.get(dependencyId);
    if (!singletonConstructor) {
        // The requested constructor was not found.
        throw new Error(/* Error message omitted */);
    }

    // Construct the singleton.
    const instantiatedSingleton =
        Reflect.construct(makeConstructorInjectable(singletonConstructor), []);

    // Cache the instantiated singleton for later reuse.
    instantiatedSingletons.set(dependencyId, instantiatedSingleton);


    return instantiatedSingleton;
}
Going further
So where do we go from here? There are some things we should consider when taking this forward.
Hang on, aren’t singletons bad?
Through all this you might be thinking, “Aren’t singletons best to be avoided?”
Ordinarily, yes. Normal global singletons that are hard-linked to our code are pretty bad because they encourage tight coupling between components, they reduce our ability to do unit testing, and they make it difficult to quickly rewire our applications.
However, dependency injection solves these problem and allows us to use singletons, eliminating the bad bits:
- DI encourages separation of concerns and loose coupling
- DI increases our ability to do unit testing
- DI makes it much easier to rewrite our application to support fast refactoring and restructuring
In short, DI makes singletons workable.
Where is the container?
Dependency injection is a design pattern that’s an implementation of the inversion of control (IoC) principle. IoC libraries often come with a container. So you might be wondering where the container is in Fusion.
The “container” in Fusion is implicit and global. This isn’t going to suit everyone, and you might rightly want to argue the benefits of having an explicit container.
However, once I decided to drop the explicit concept of the container, I discovered that it vastly simplified the job of coding the DI library. The DI library is also simpler to use because there is no container to be configured.
The next thing I discovered is that I just don’t need the container! I’ve built several large applications on Fusion (including the incredibly complex codebase for Data-Forge Notebook). I have never lamented the lack of a container.
Fusion was born from practical concerns. It grew with my needs, and I only added the features that were necessary. I may add more general-purpose features in the future, but the driving goal will always be simplicity. I’ve traded generality for simplicity, and I don’t regret it.
Eliminating magic strings
If you take issue with the magic strings used to identify dependencies (who wouldn’t?), then you can easily eliminate them by storing and reusing the ID in a variable. Let’s consider an example with the logging singleton.
Say we define our ILog interface as shown in listing 15. We can then extend the ILog namespace with an id variable. We can then use that variable instead of the magic string, as you can see in listing 16. This demonstrates a simple way to remove magic strings, and it’s totally under your control.
Listing 15: Extending the ILog namespace with an id variable
interface ILog {
    info(msg: string): void;
}

//
// Extend the ILog namespace to with an id variable.
//
namespace ILog {
    export const id = "ILog";
}
Listing 16: Using the id variable instead of the magic string
@InjectableClass()
export class MyClass {

    @InjectProperty(ILog.id)
    log!: ILog;

    // ... code omitted ...
}
Ensuring type safety
For those of you wondering how to make dependency injection type-safe, rest assured that you can take this further still.
Thanks to the valuable input from @hediet_dev (please read the conversation on Twitter), it’s also possible to use tslint to create a rule to enforce type safety. To delve further into this please see the README for Fusion on GitHub.
Future enhancements
The only thing that Fusion is missing that I’d still like to add is automated injection of constructor parameters. Currently, injection only works for class properties, but it would be very nice to extend it to cover constructor parameters as well. So please watch this space — injection of constructor parameters may come in the future.
Conclusion
In this blog post, I’ve shown that it’s not difficult to roll your own DI code library. Indeed, I’ve shown that a robust and flexible yet still simple-to-use system can be delivered in fewer than 300 lines of code.
The advantage of building your own system is that you can make it work however you want so that it perfectly fits the needs for your project.
I’d encourage anyone to have a go at building their own DI library, it’s a great learning experience if nothing else! Or otherwise, please feel free to fork the Fusion code, then make your own improvements, create your own customizations, or just have fun and experiment with it!